 My biggest guilty pleasure in life, aside from my love of tortilla and potato chips, is that I still to this day crave a boxed funfetti cake. My mom isn’t much of a baker, but boy did she make a mean boxed cake as a treat us and they were delicious. About once a year, I’ll treat myself to one and I don’t care what anyone says—or care that I can probably make a better one from scratch myself—a boxed cake mix is just so nostalgic that it’ll always taste great to me. I wanted to bring that distinct boxed funfetti flavor to a homemade cake, but you know that I can’t just give you something that has been done before, time and time again. So I wanted to bring another twist to an already great dessert, the Boston Cream Pie. I have a few pistachio variations on the blog already but this Birthday Boston Cream Pie really takes the cake. We could all really use a bit of cheering up during these crazy times, and this cake is sure cure all of our quarantine blues.
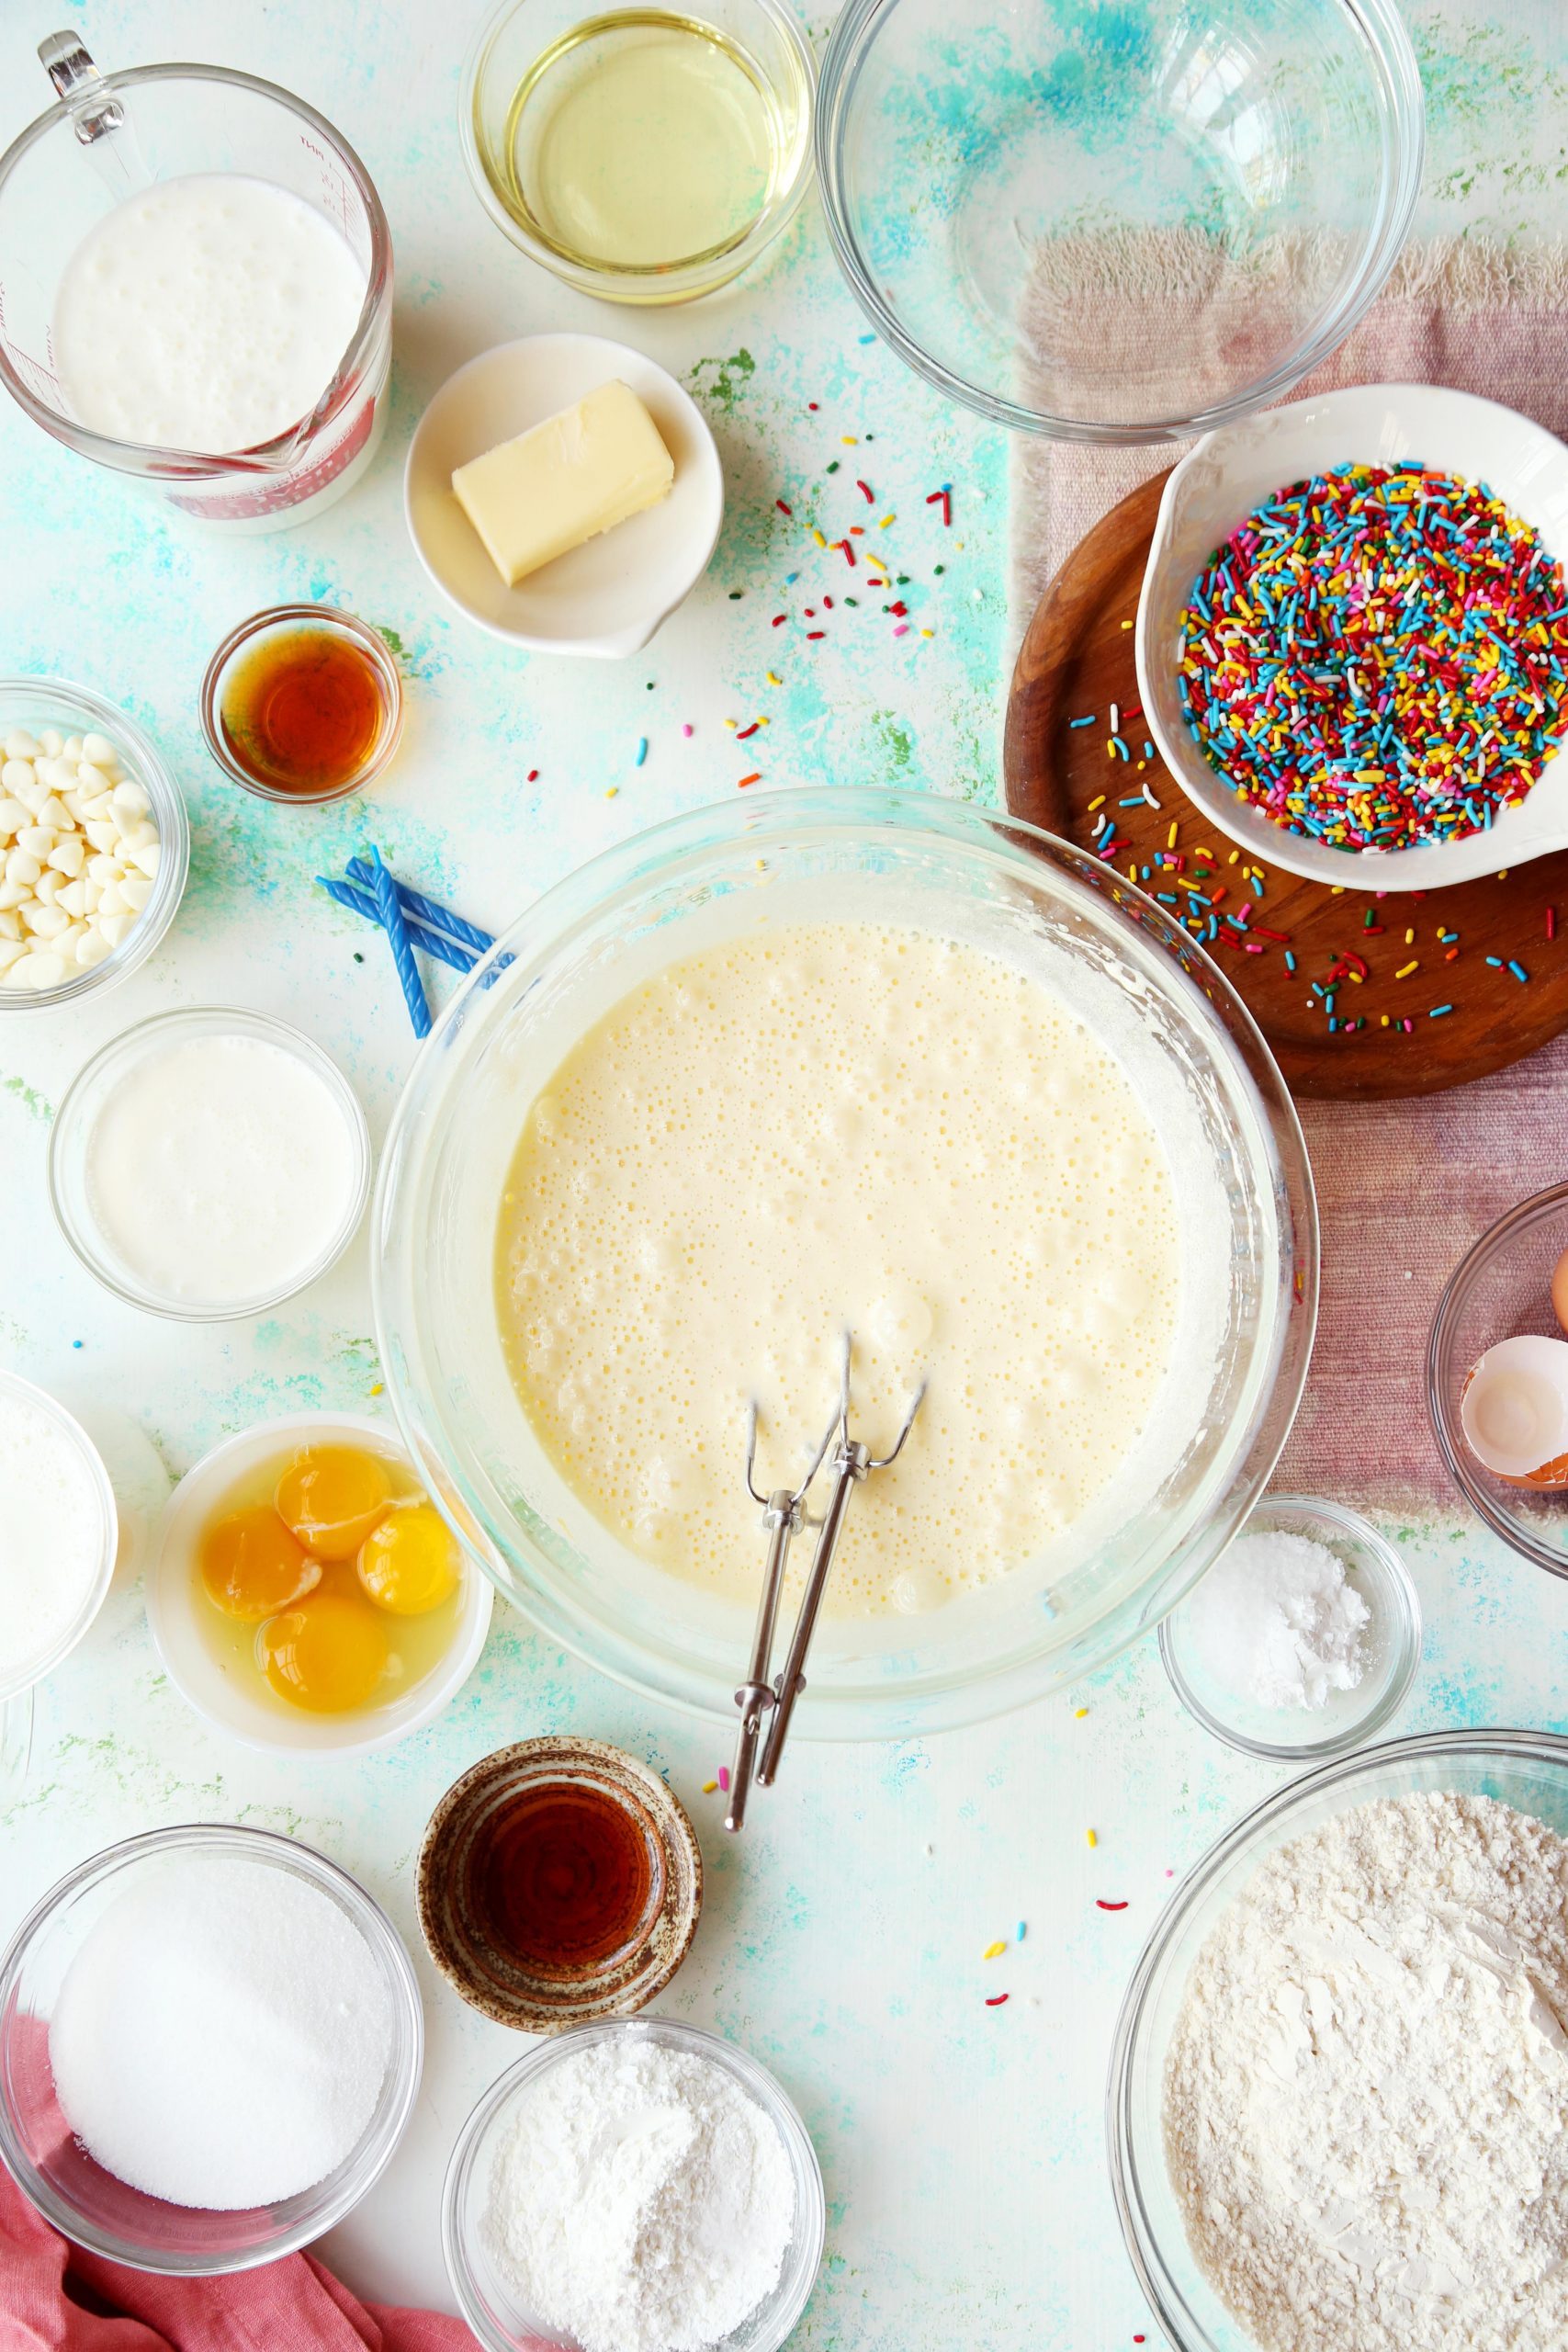
Beat the sugar and eggs together until they’re light and fluffy, about 2 minutes at medium-high speed using an electric or stand mixer. Then slowly beat in the vegetable oil.
 Add the flour, salt, and baking powder to the egg mixture and beat until just combined. Use a rubber spatula to scrape the sides and bottom of the bowl to evenly incorporate.
 In a small bowl or measuring cup, whisk together the milk, butter and vanilla. Slowly add the liquids to the cake batter, mixing until everything is well combined.
**Tip: Whenever I make cakes, I always use buttermilk because I find that it helps to make a very moist cake. If you don’t have any on hand, you can use whole milk instead or make your own buttermilk by adding a teaspoon of vinegar or lemon juice to a cup of whole milk and letting it sit for about 10 minutes.**
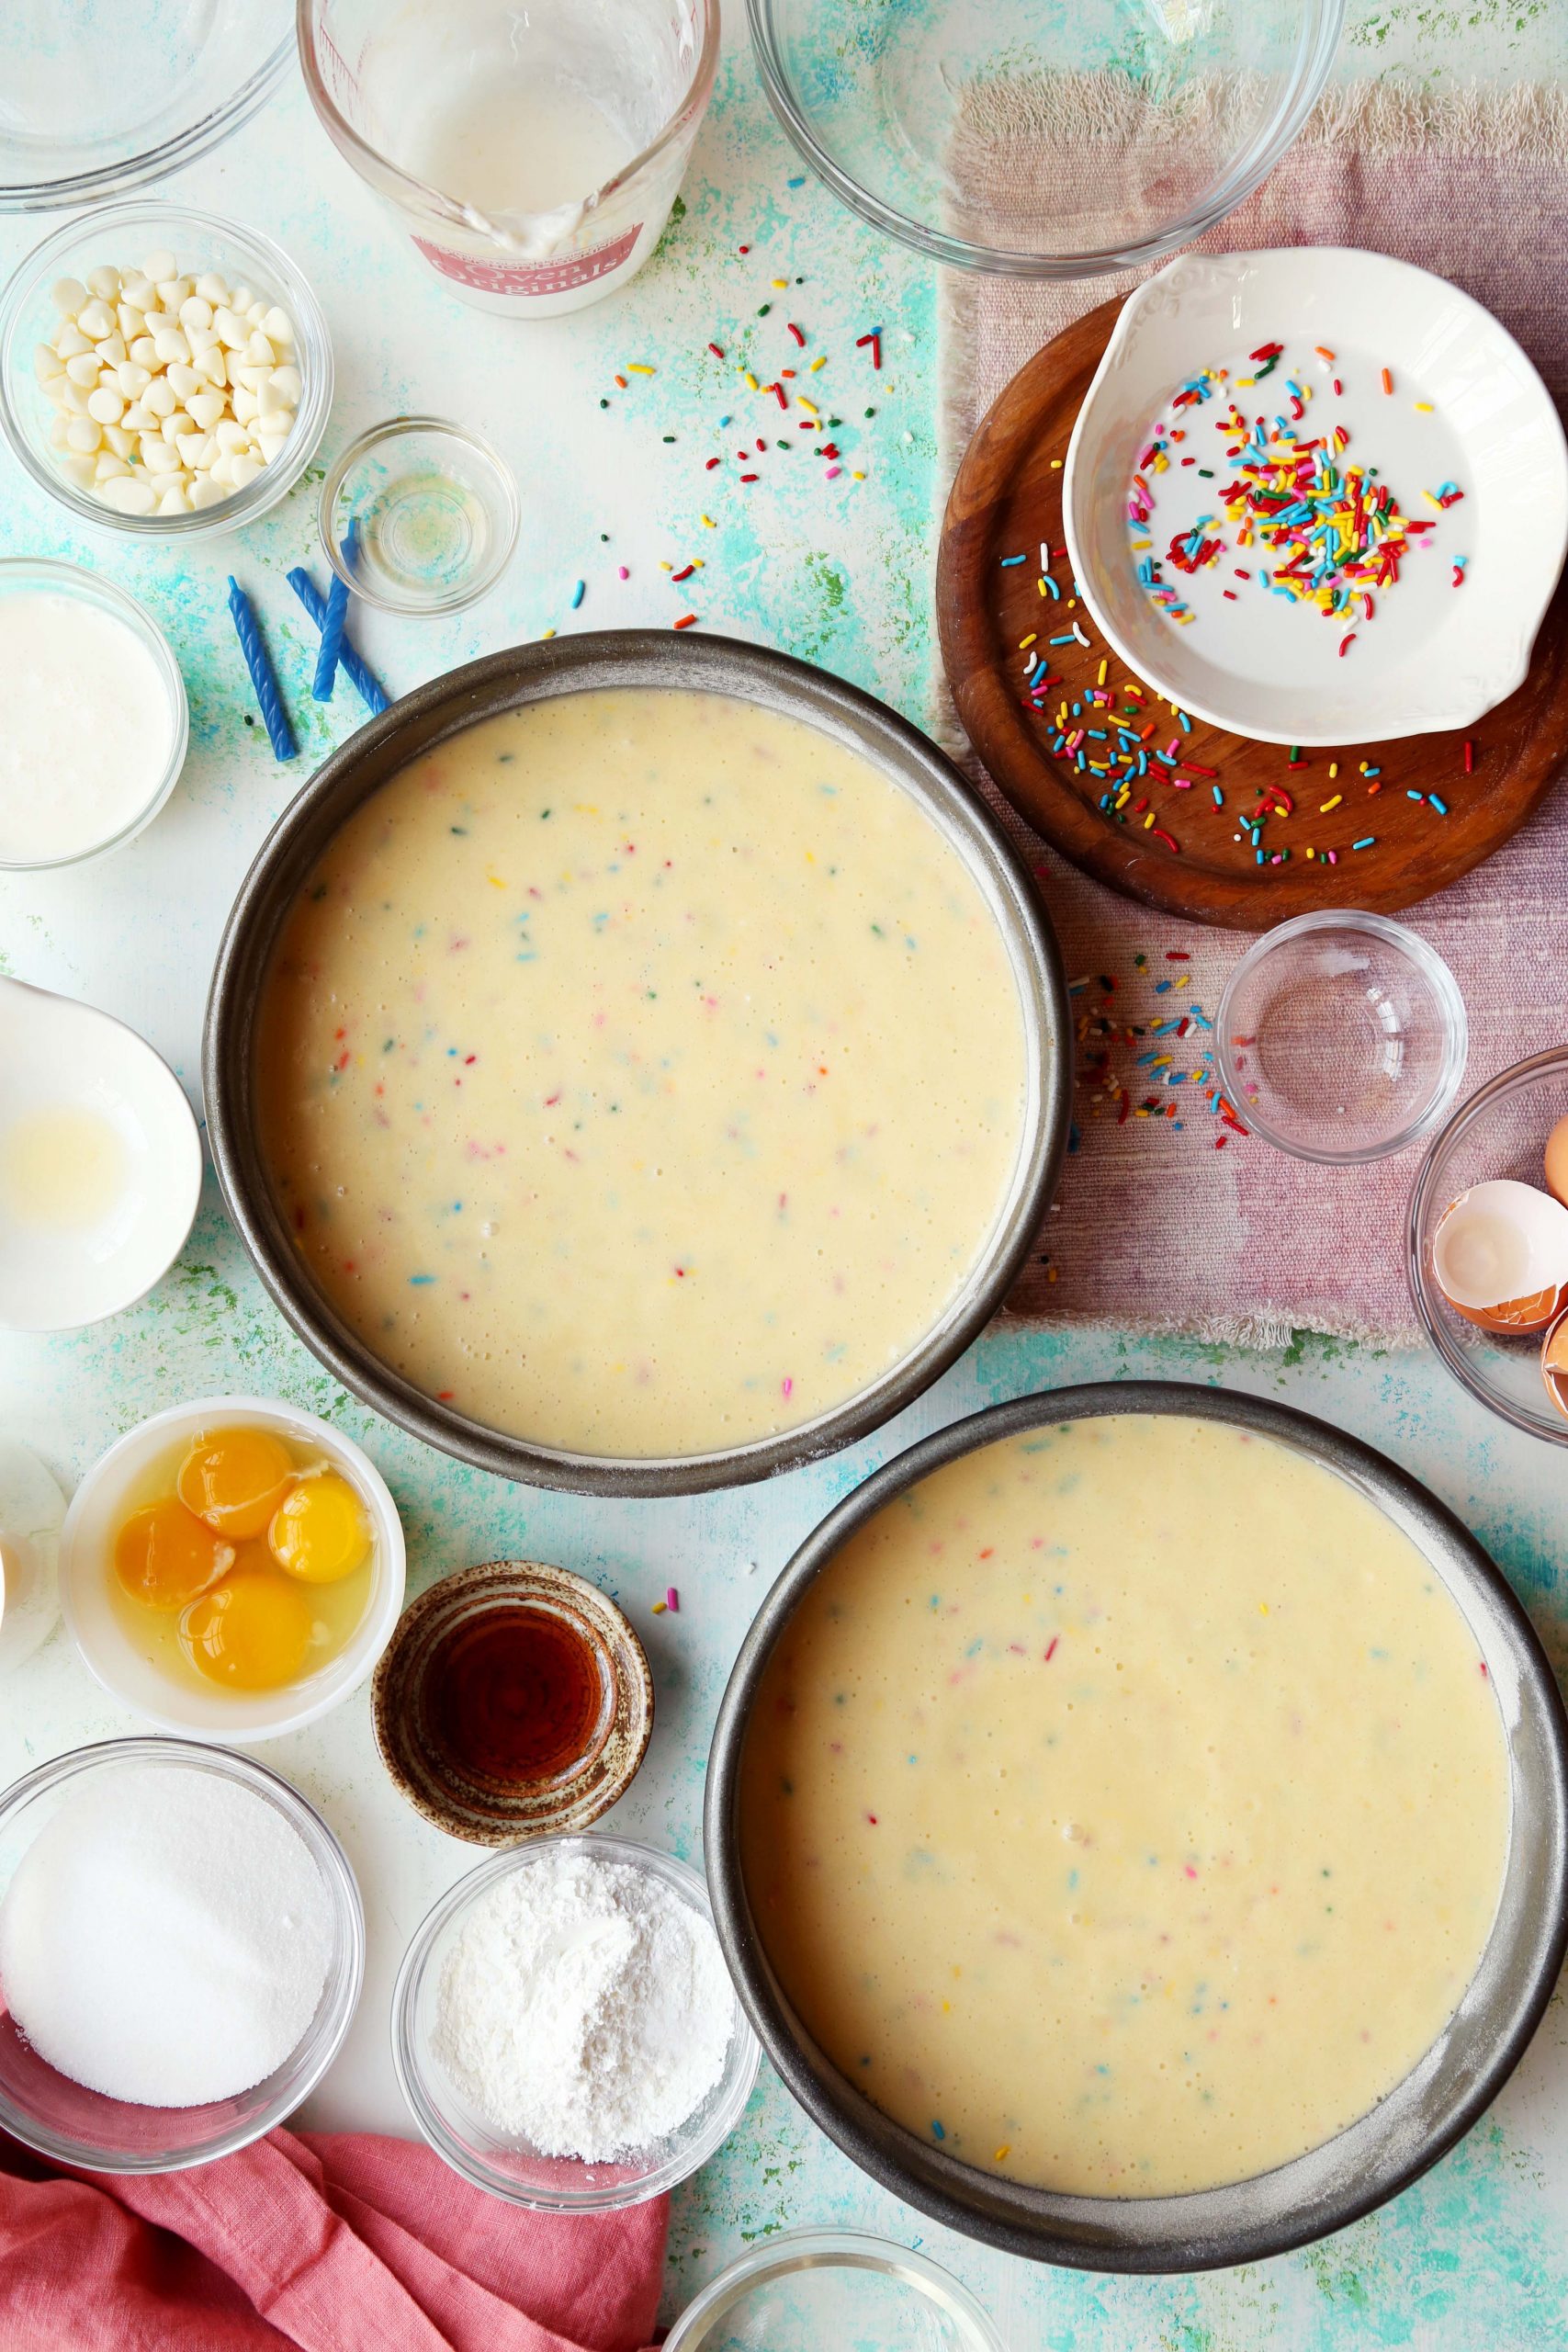
 Fold in the multi-colored sprinkles with a spatula, just until they’re evenly distributed. It’s important to not that the batter will be very thin, but that’s okay. You didn’t do anything wrong!
 Divide the batter evenly among two 9-inch round cake pans that have been greased and floured and bake in a preheated 325°F oven for 30 to 35 minutes, or until a toothpick inserted into the center comes out clean.
 To make the filling: In a medium-sized saucepan, stir together 2 cups of the milk, the sugar, and the salt. Bring to a simmer over medium heat, stirring to dissolve the sugar. In a separate bowl, whisk the cornstarch, egg yolks, and whole egg with the remaining 1/2 cup milk.
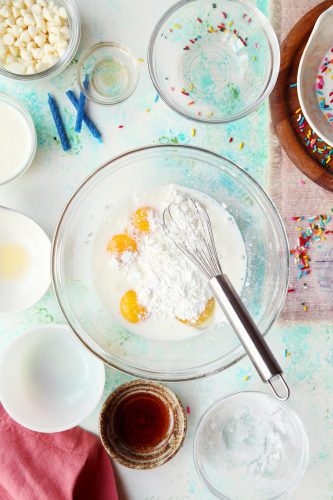
Whisk some of the hot milk mixture into the egg yolks/cornstarch to temper the yolks. Pour the egg/milk mixture back into the remaining simmering milk in the pan, pouring it through a strainer to capture any bits of egg.
**Note: Tempering is very important because it prevents the eggs from curdling. If you were to just add the eggs straight into the hot liquid, they’ll cook and become scrambled eggs in milk. By adding a small amount of the hot liquid to the eggs first, it brings the eggs to the same temperature of the hot milk!**
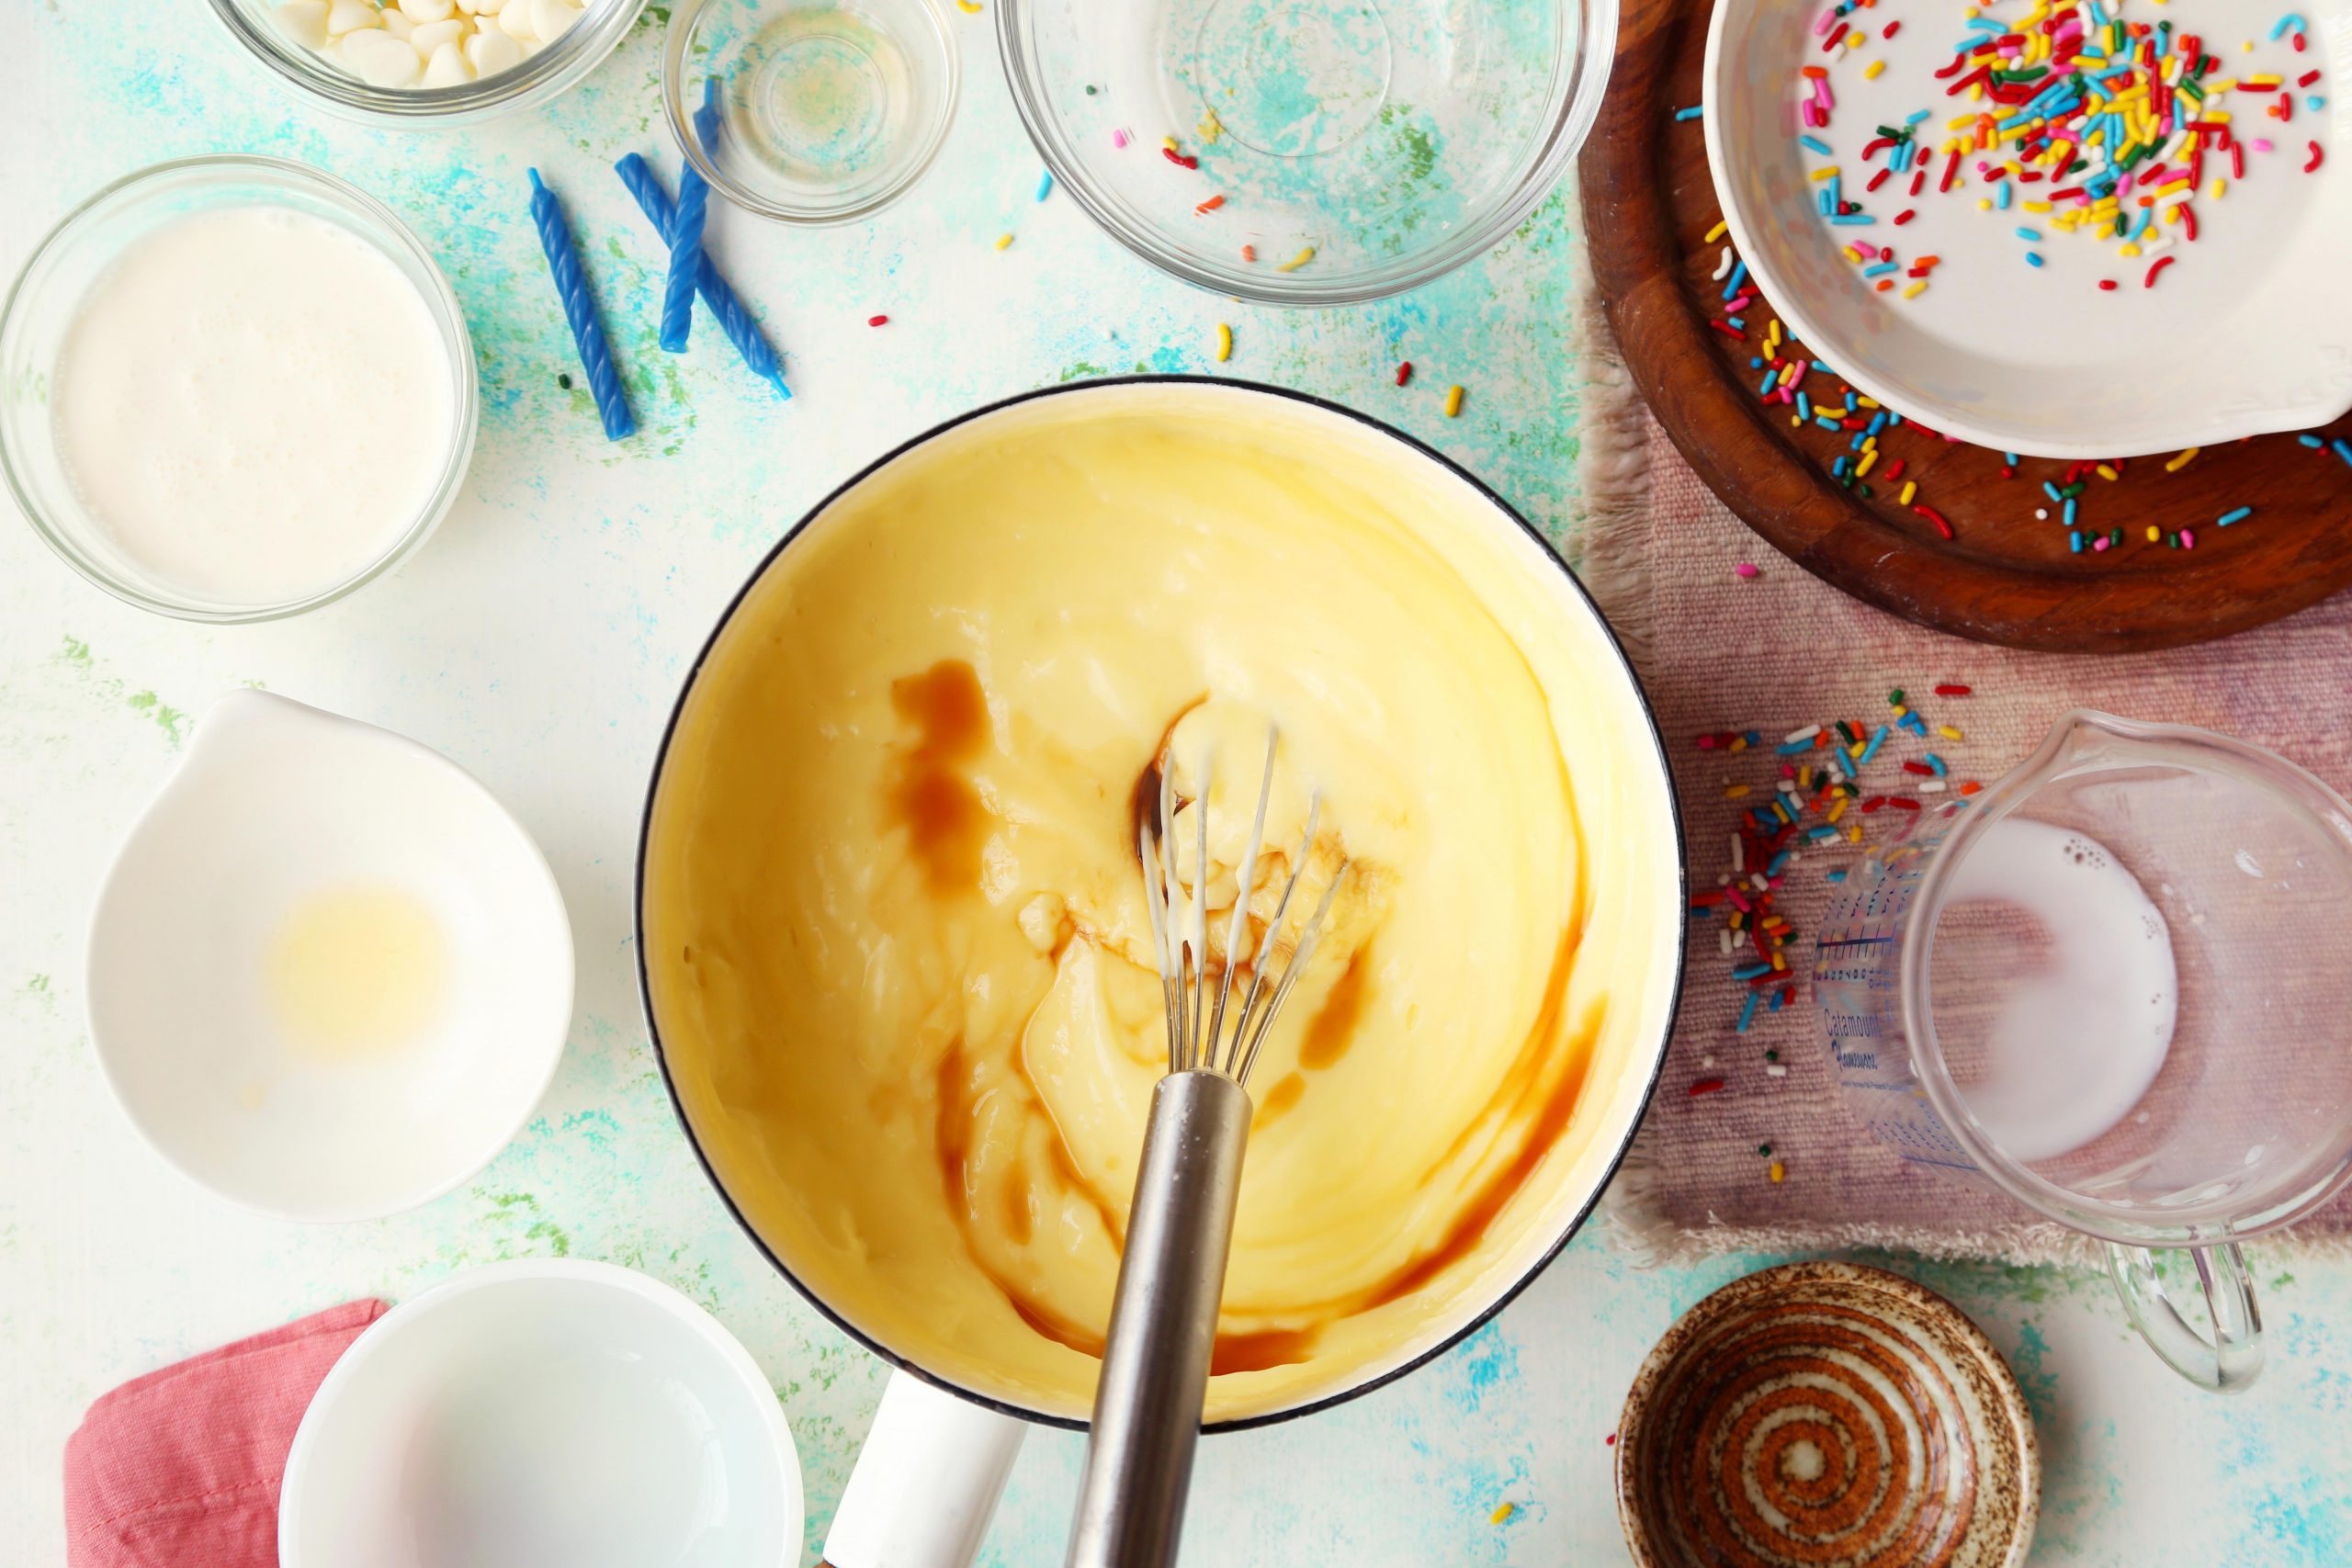
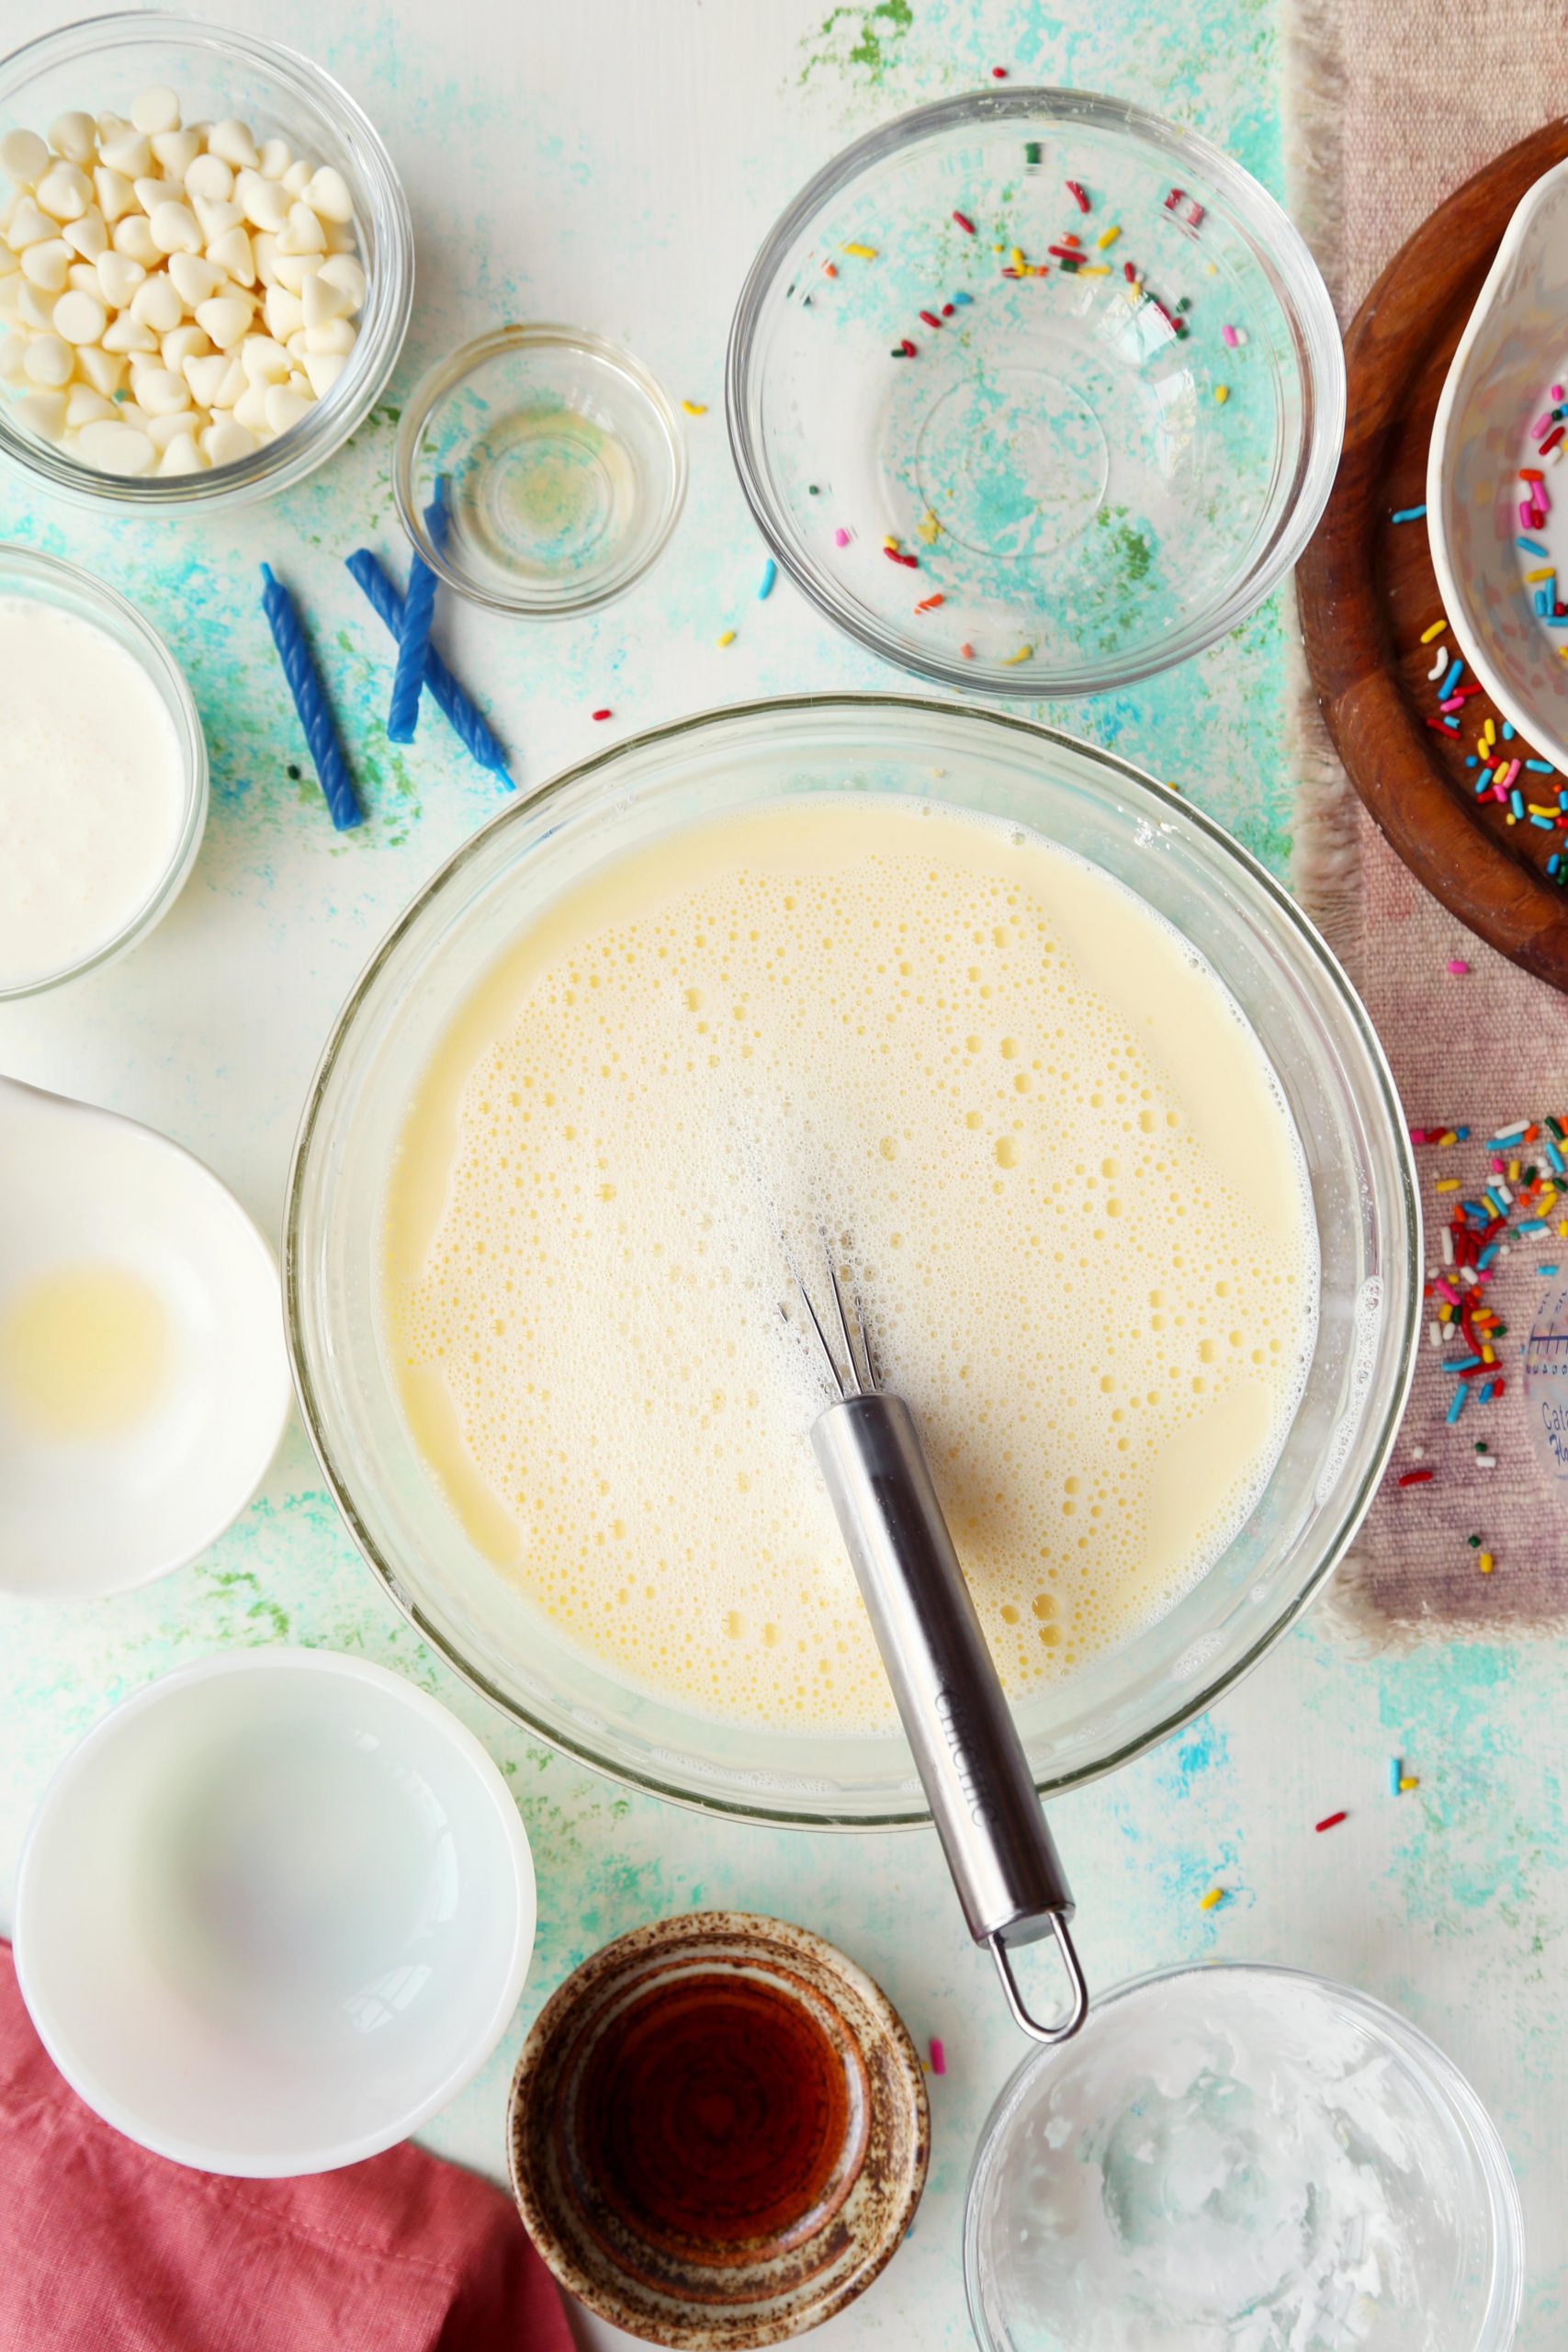 Bring the mixture to a low boil over medium heat, stirring constantly with a whisk, and cook for 2 minutes; the mixture will thicken significantly. Remove the filling from the heat and stir in the vanilla. Transfer the filling to a heatproof bowl, and top it with a piece of buttered plastic wrap (make sure it touches the top of the filling so it doesn’t develop a skin). Refrigerate until cool.
**Note: The mixture might come to a boil very quickly so it’s very important to give it your undivided attention and not walk away from it at all. You also want to continue whisking it nonstop so that it doesn’t curdle or burn at the bottom.**
 In the meantime, let’s work on the topping. Melt the chocolate and cream together until smooth and lump-free. Add the vanilla and stir well. Let the glaze sit for about 10 minutes to cool a bit and to thicken slightly.
**Note: I’m using white chocolate chips for this because I felt like it would go so well with the funfetti cake, but if all you have is regular chocolate chips, that would be delicious as well!**
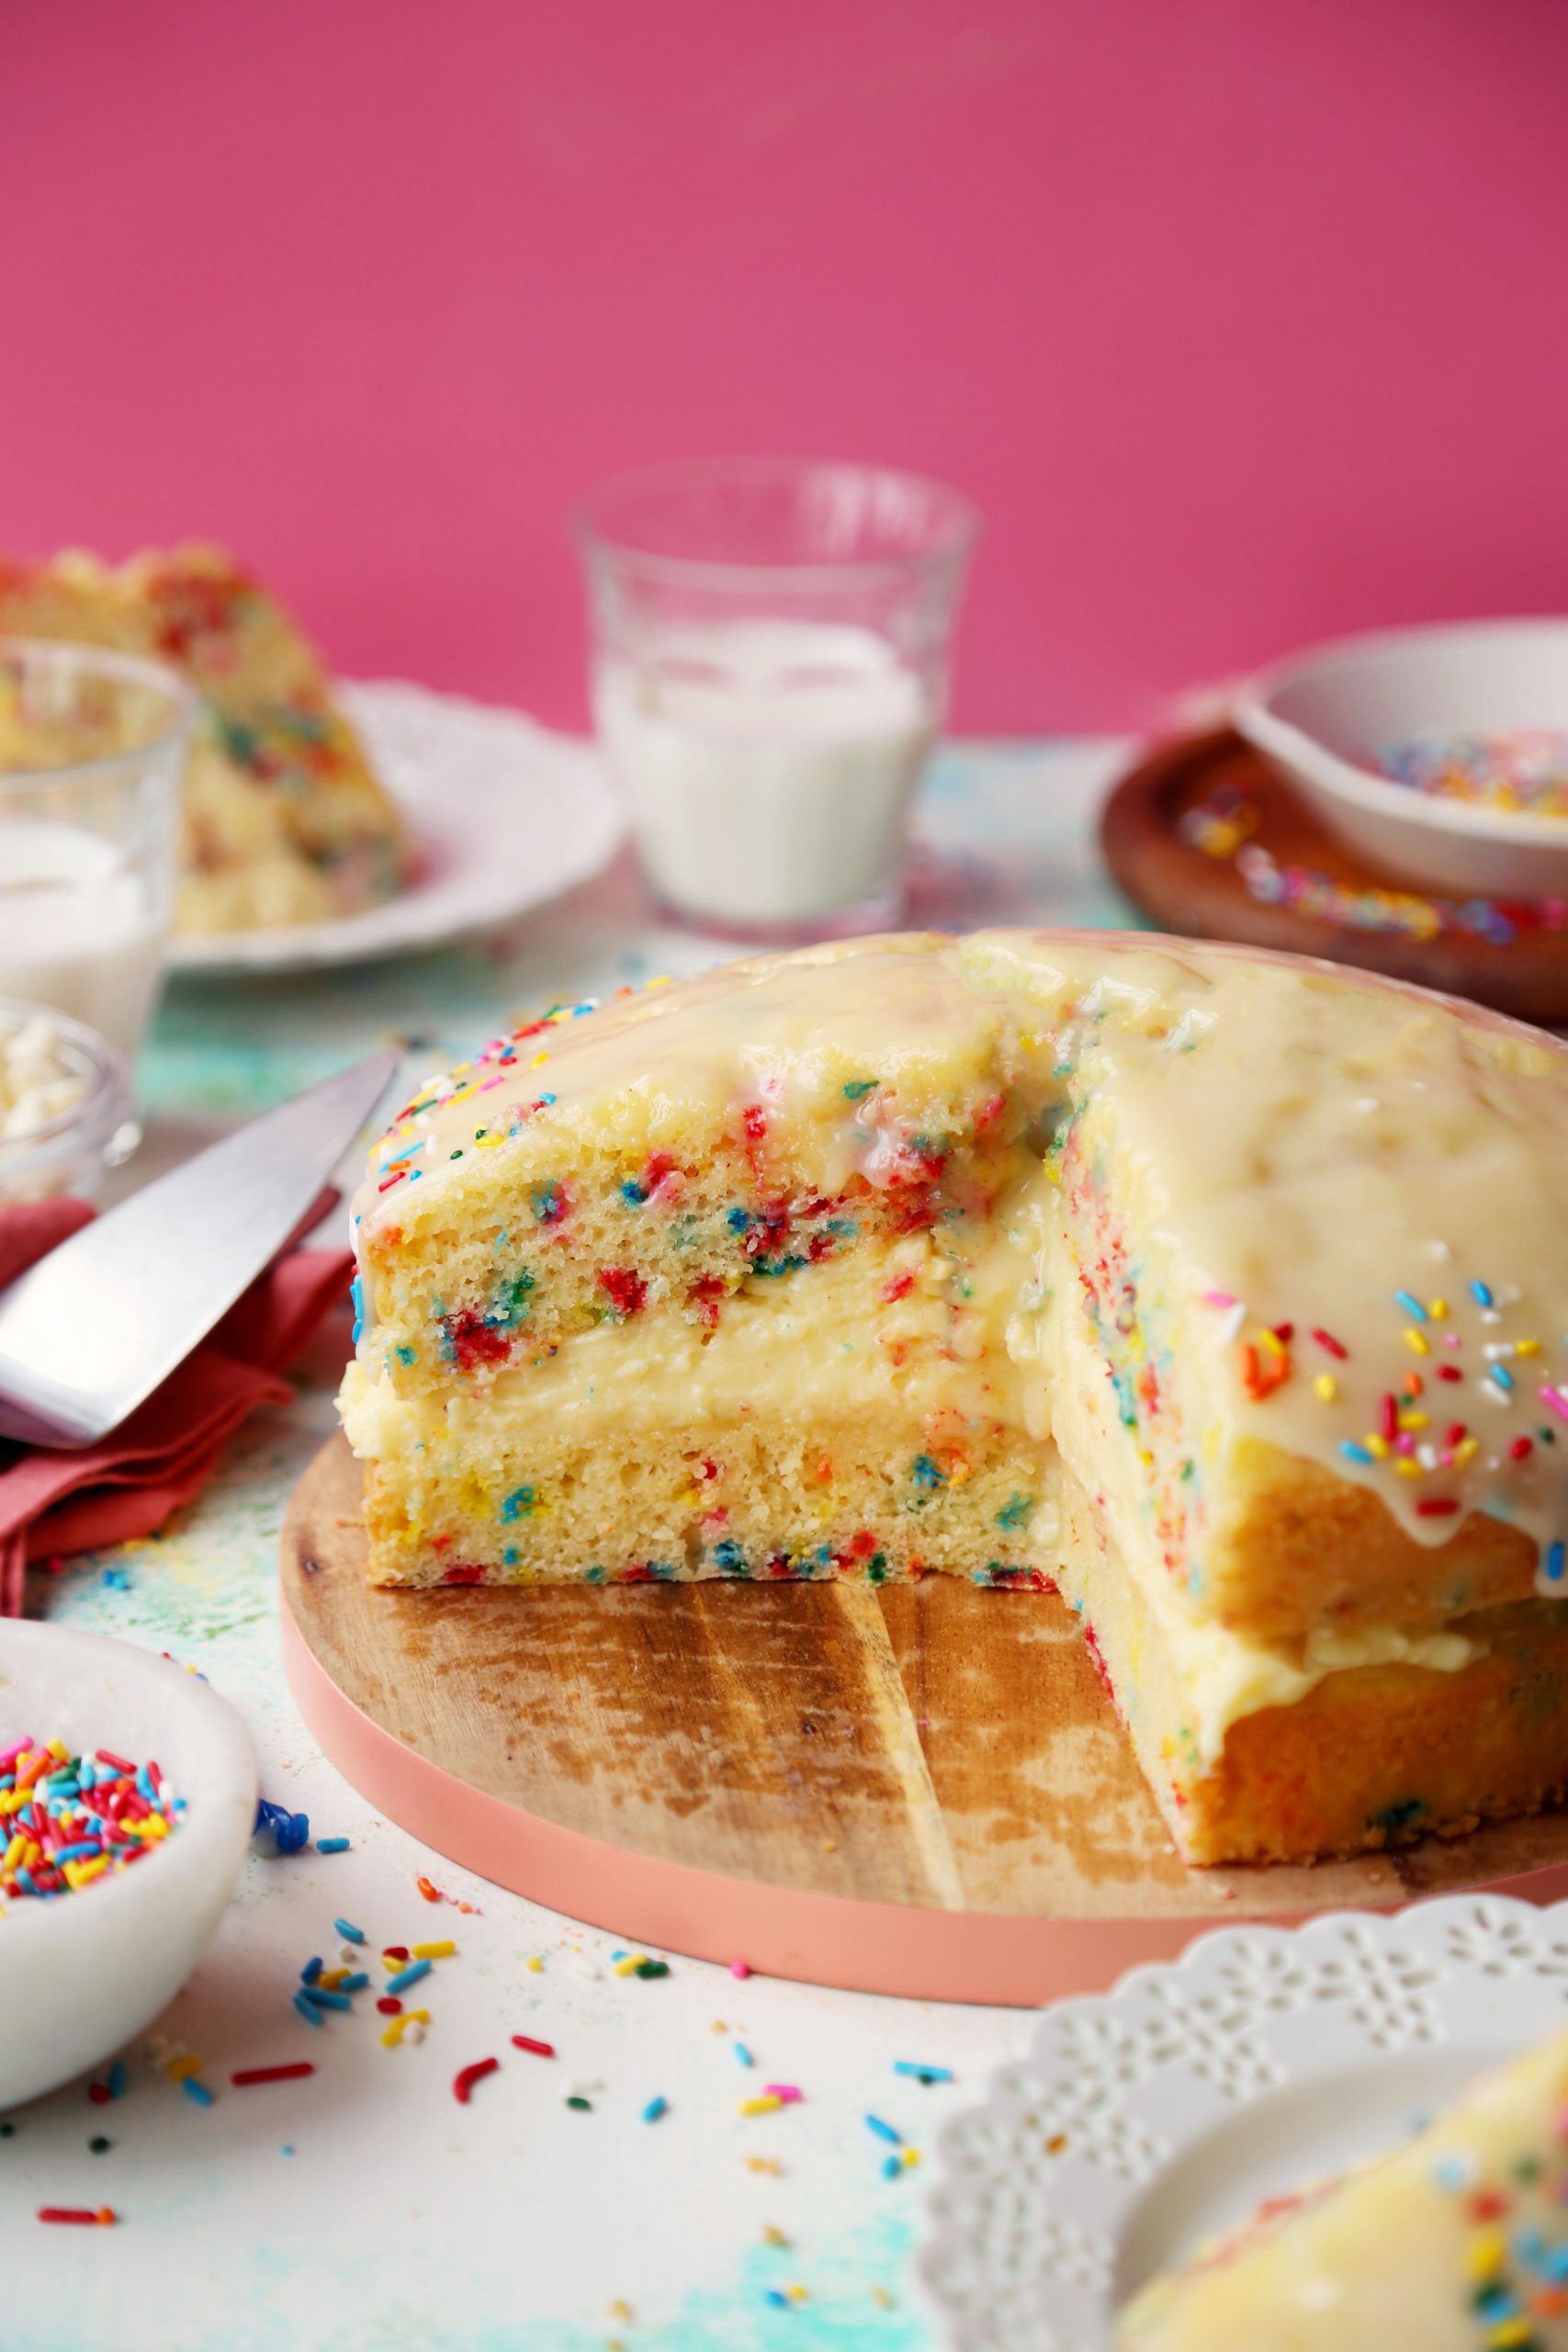
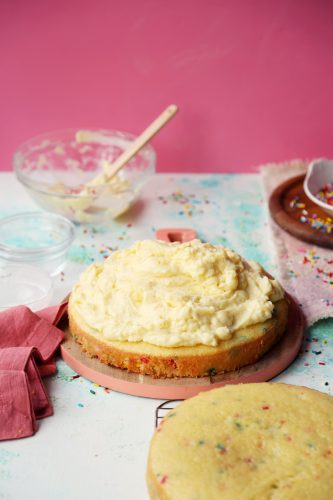
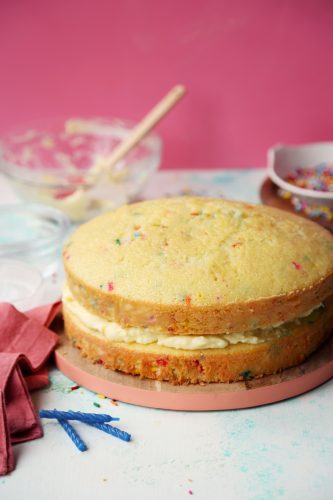
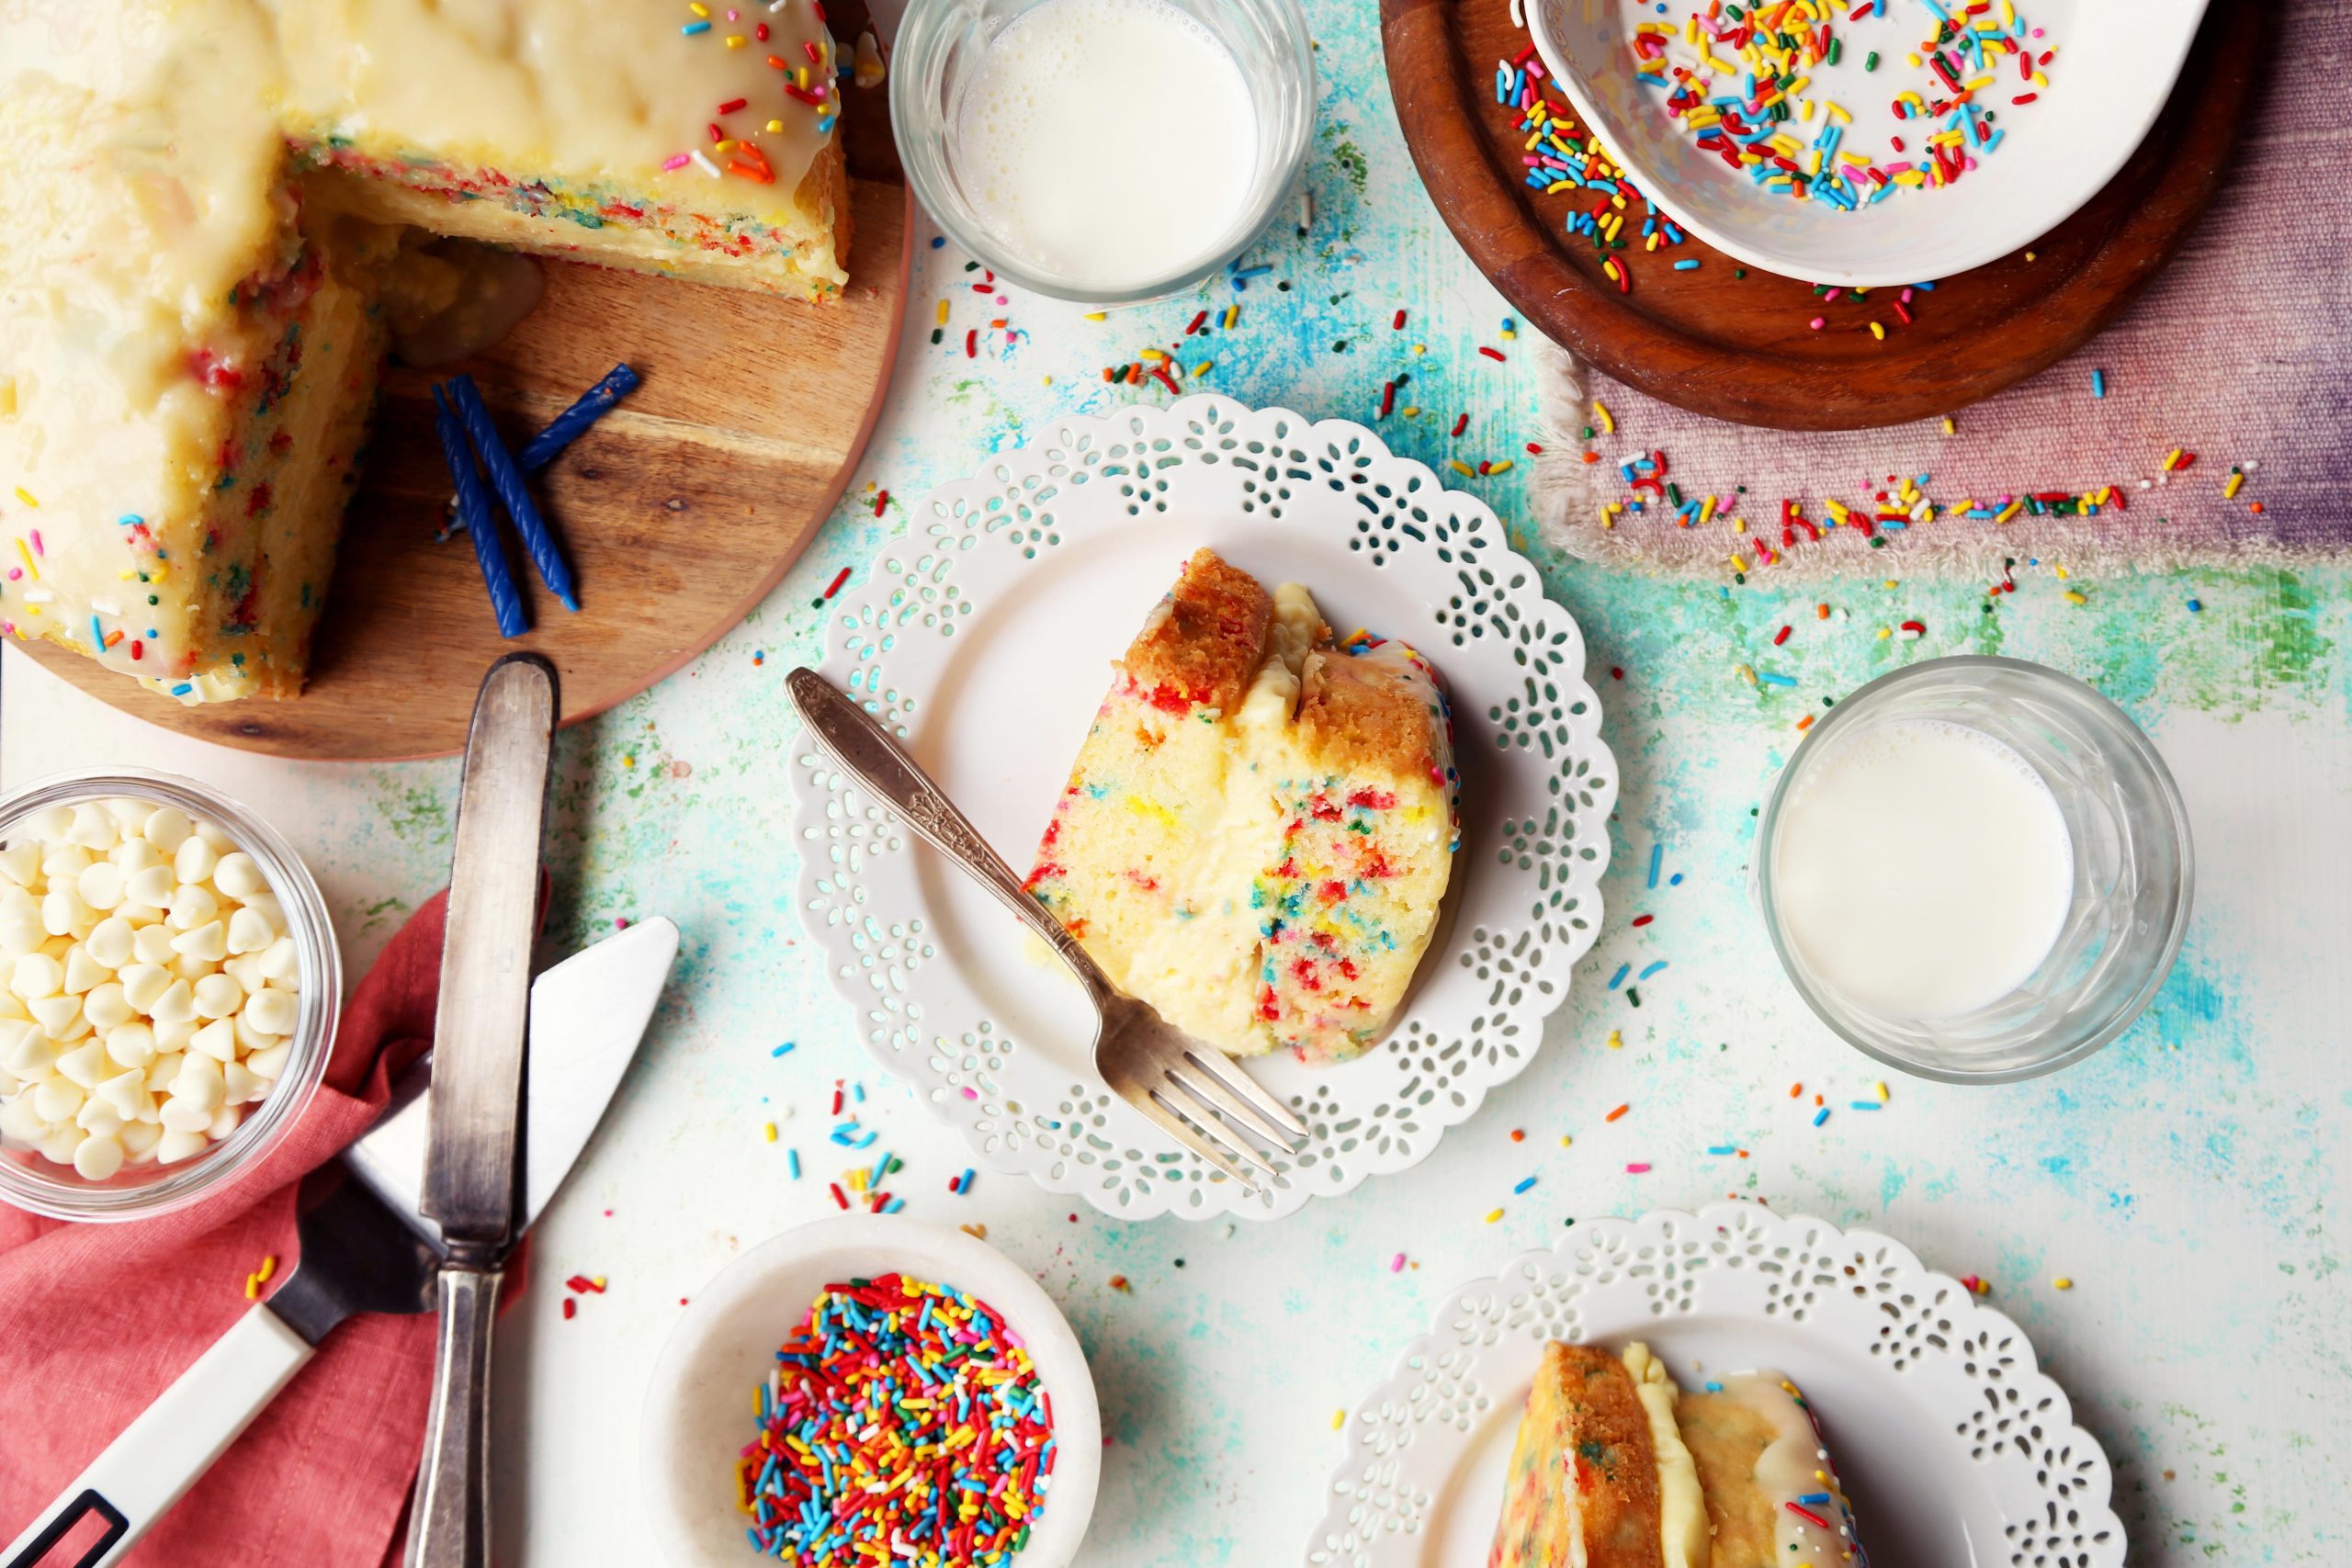
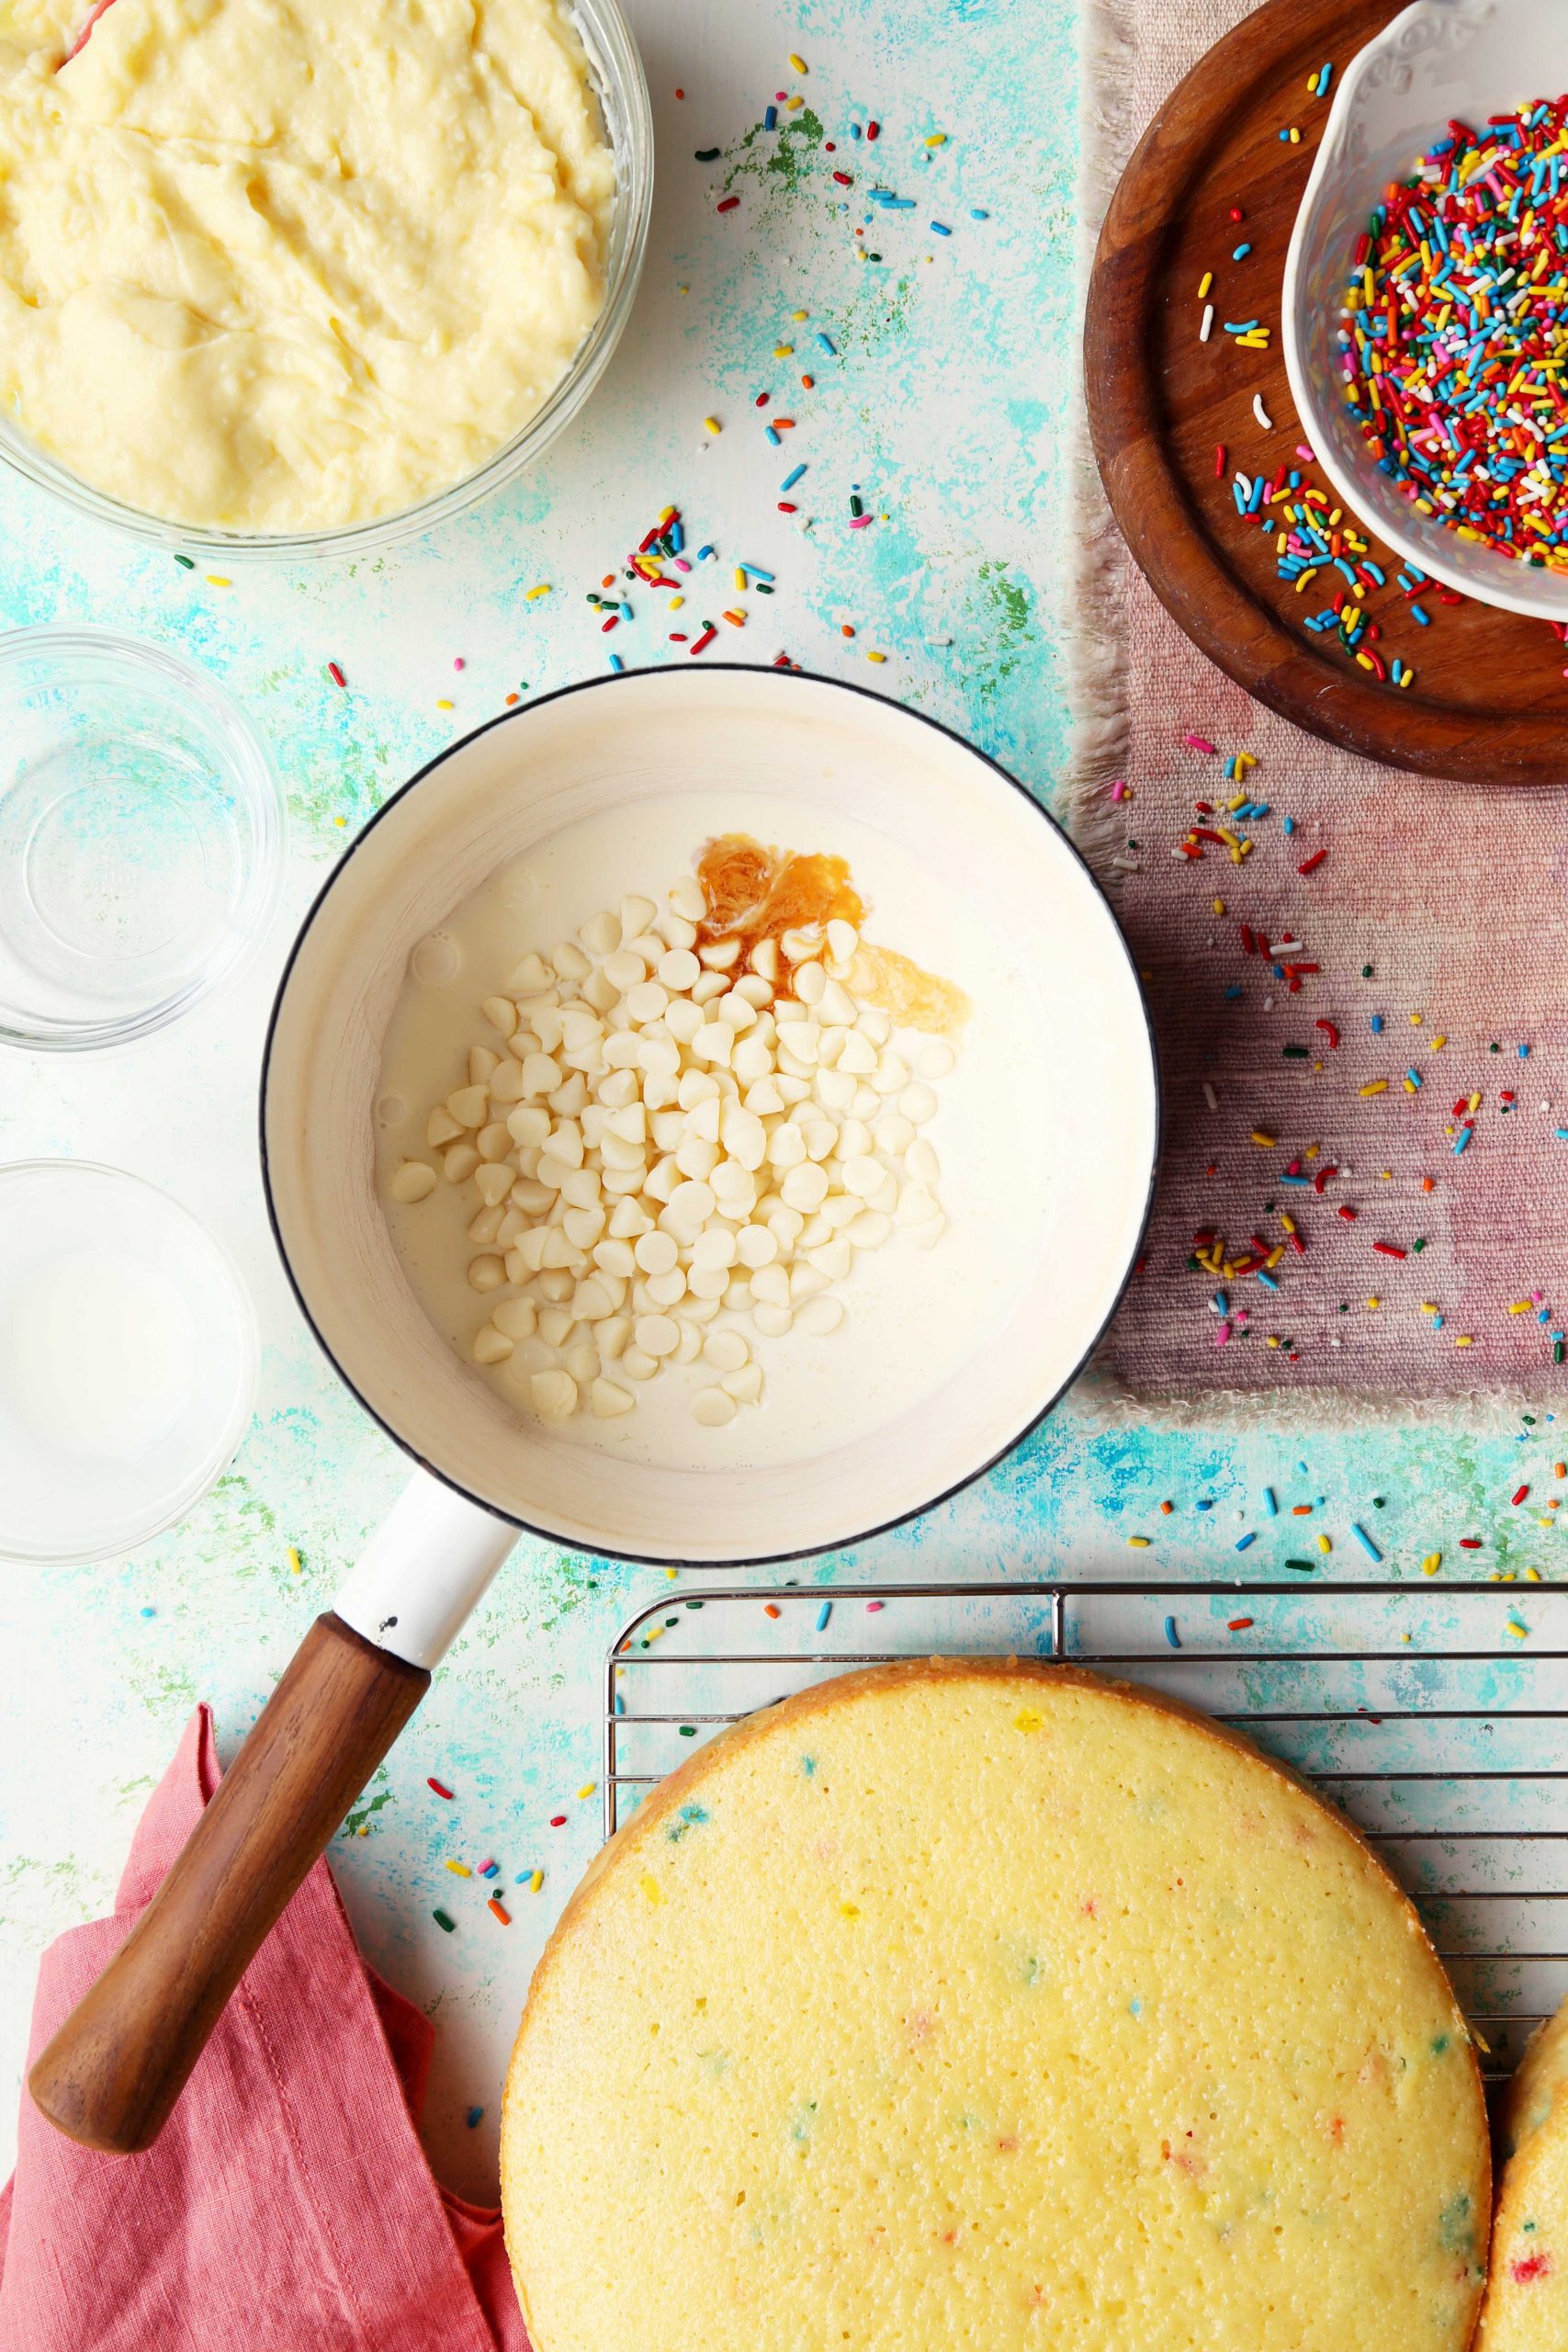 When the cakes and pastry cream are completely cool, spread the filling in an even layer over one cake layer then stack the second layer on top.
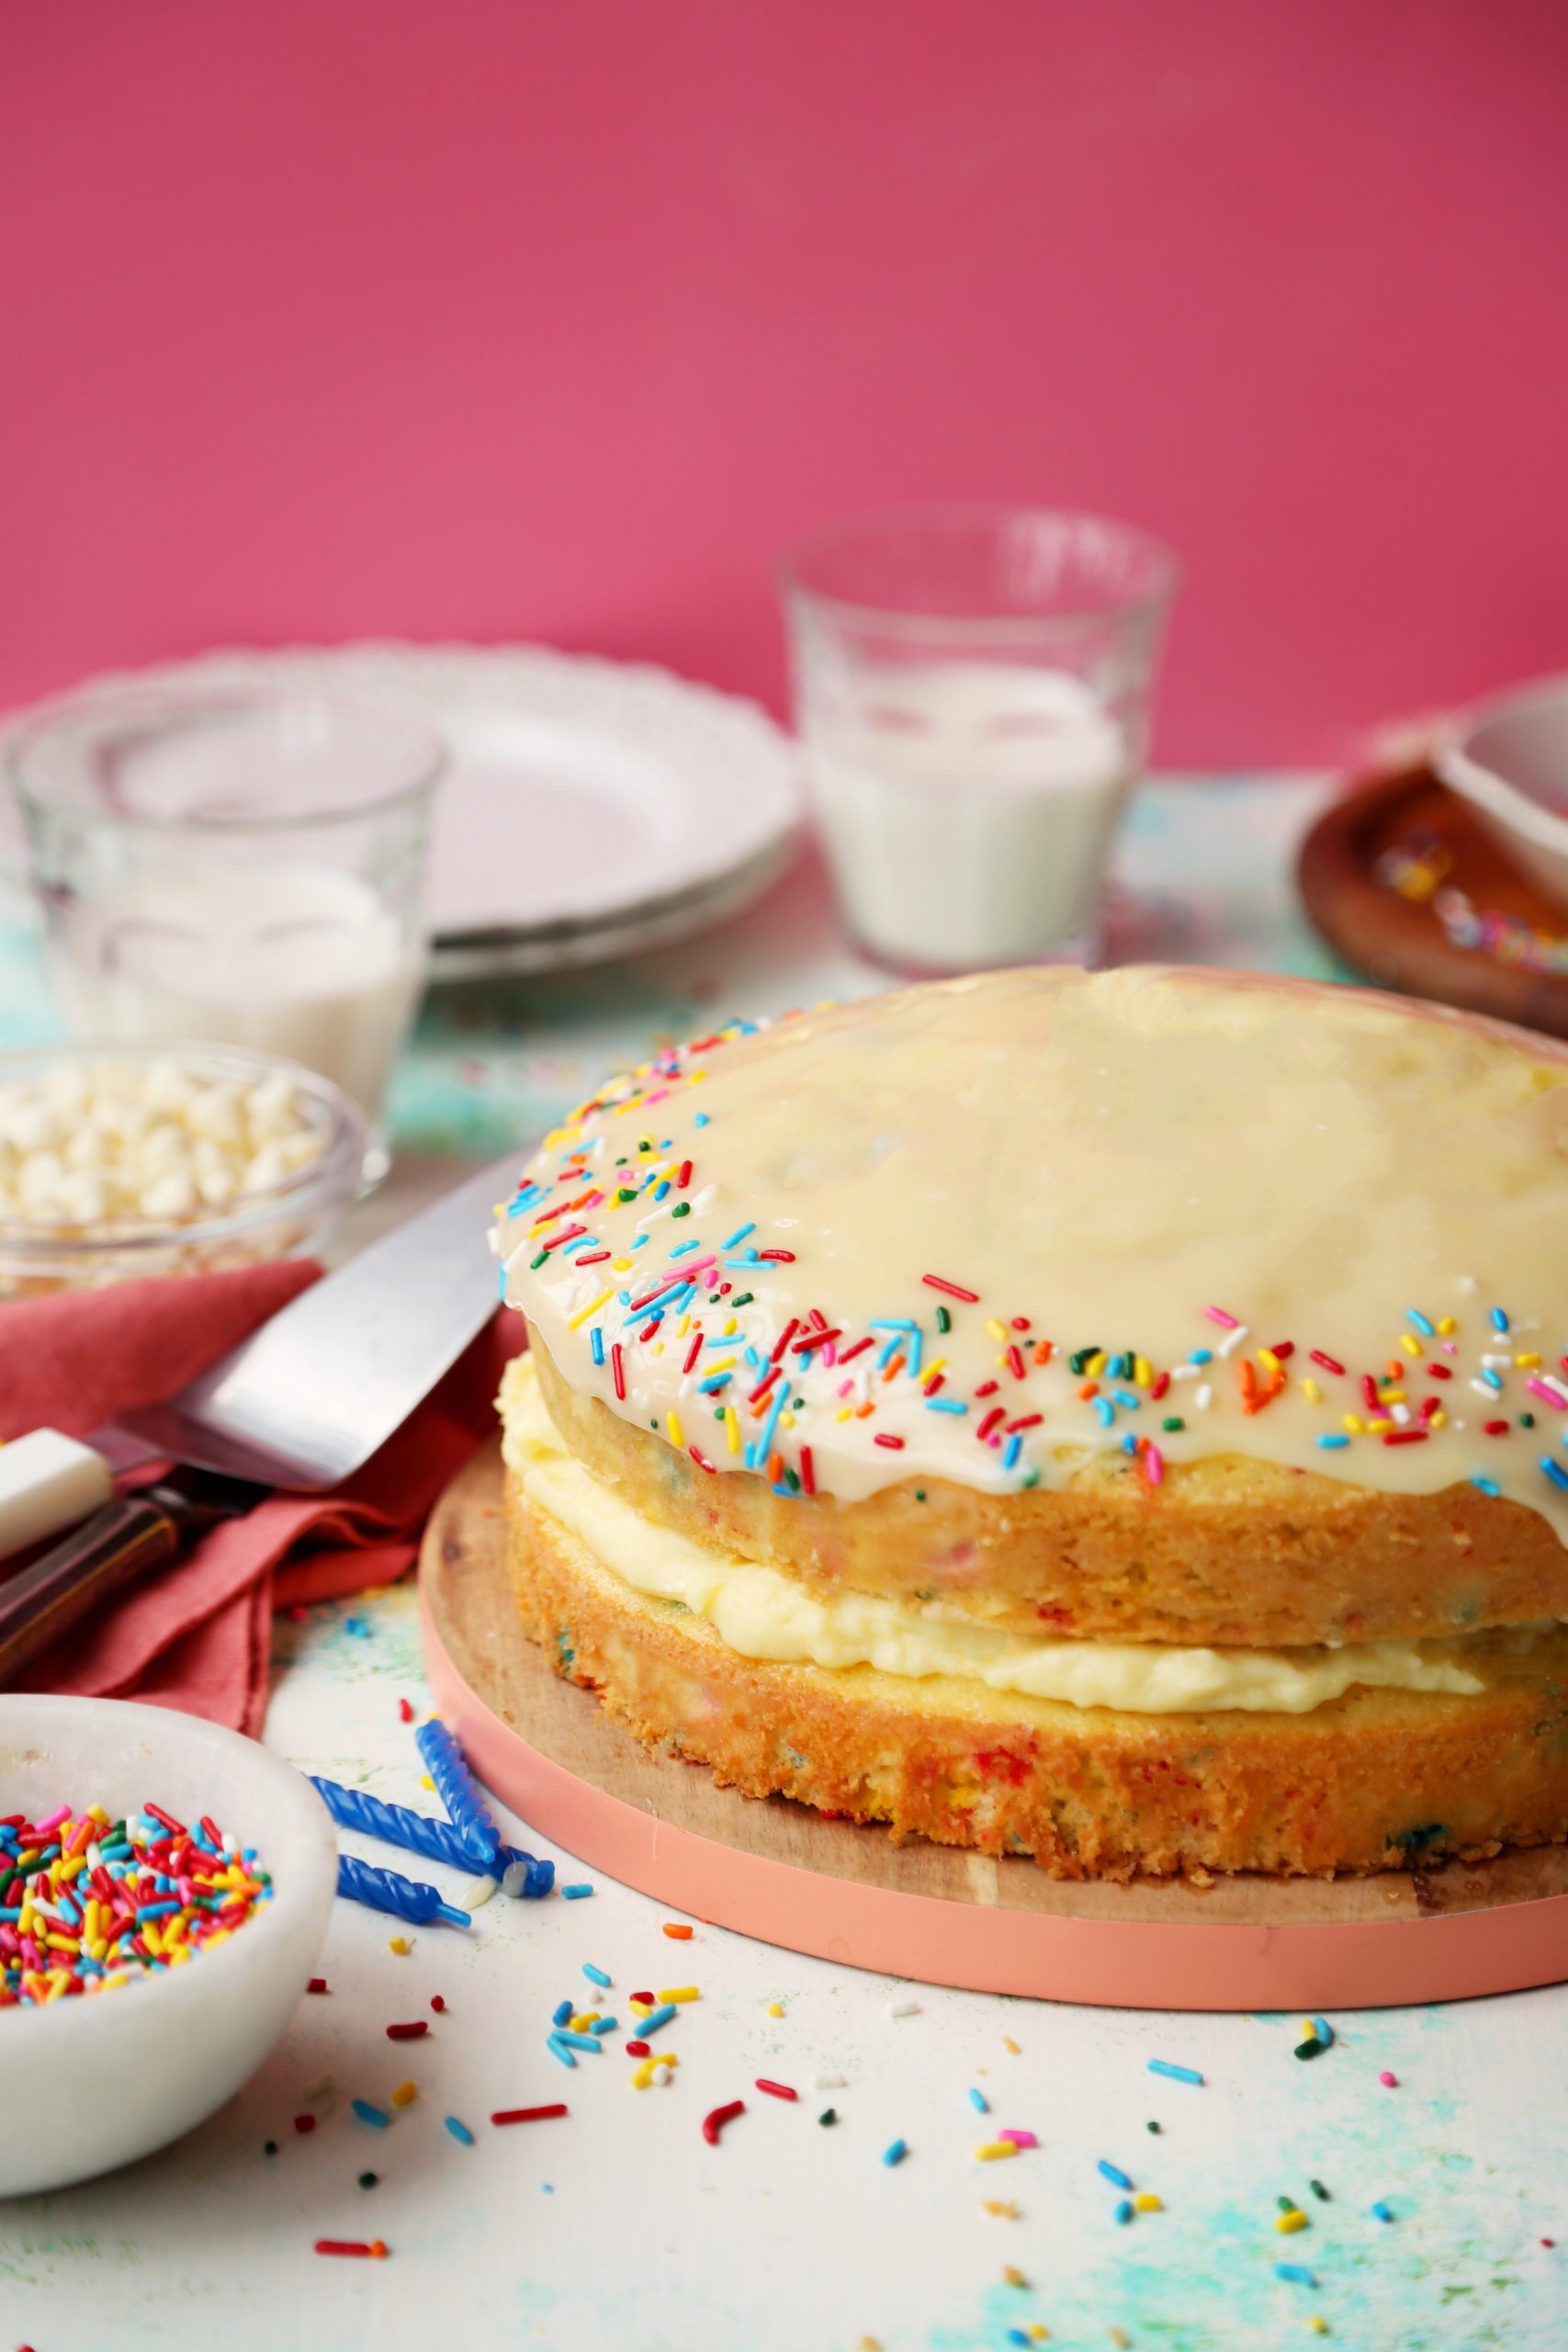
Pour the slightly thickened white chocolate glaze over the top of the assembled cake and top with sprinkles all along the edge of the cake.
**Tip: You’ll have to use a spatula to help spread the glaze on top and allow some of it to slightly drip around the edges. If the glaze is too thick before pouring it on, you can rewarm very quickly over very low heat until it’s pourable. You don’t want it too hot though.**
 You can slice and serve the cake immediately or place it in the fridge until ready to serve. If you plan on eating it the next day, you can wrap the chilled cake loosely in plastic wrap and keep in the fridge for up to 3 days. Just allow it to come to room temperature slightly before serving.
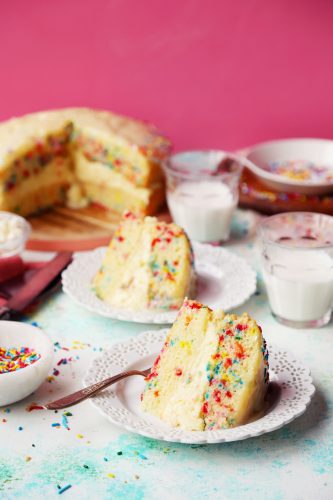
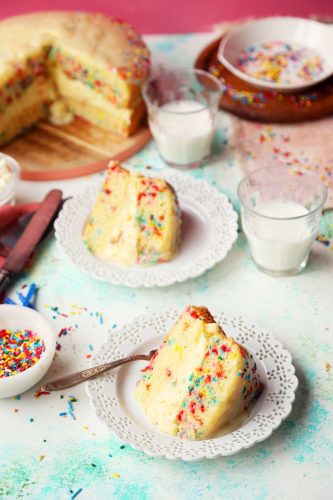
This is a very decadent and very sweet cake, and so if you have the world’s biggest sweet tooth, then this is the cake for you. If not, but you still are intrigued, a tiny slice will do the trick and then you can share the rest! It’s a fun twist on a classic Boston cream pie, unless you’re a Boston cream pie loyalist and then this might be slightly blasphemous. Just slightly.
 I hope you make this cake soon, if not for a birthday, then just a raise-your-spirits kind of cake. or a quarantine-won’t-break-me-down type of cake. I know it might seem like a lot of steps, but it’s actually a lot of fun to make. Get some of your family or friends you’re hunkered down with to help you because cooking is always so much more fun with other people. As always, drop your comments, questions or concerns below, I’m here to help. Stay safe my friends.
Birthday Boston Cream Pie
Ingredients
Cake:
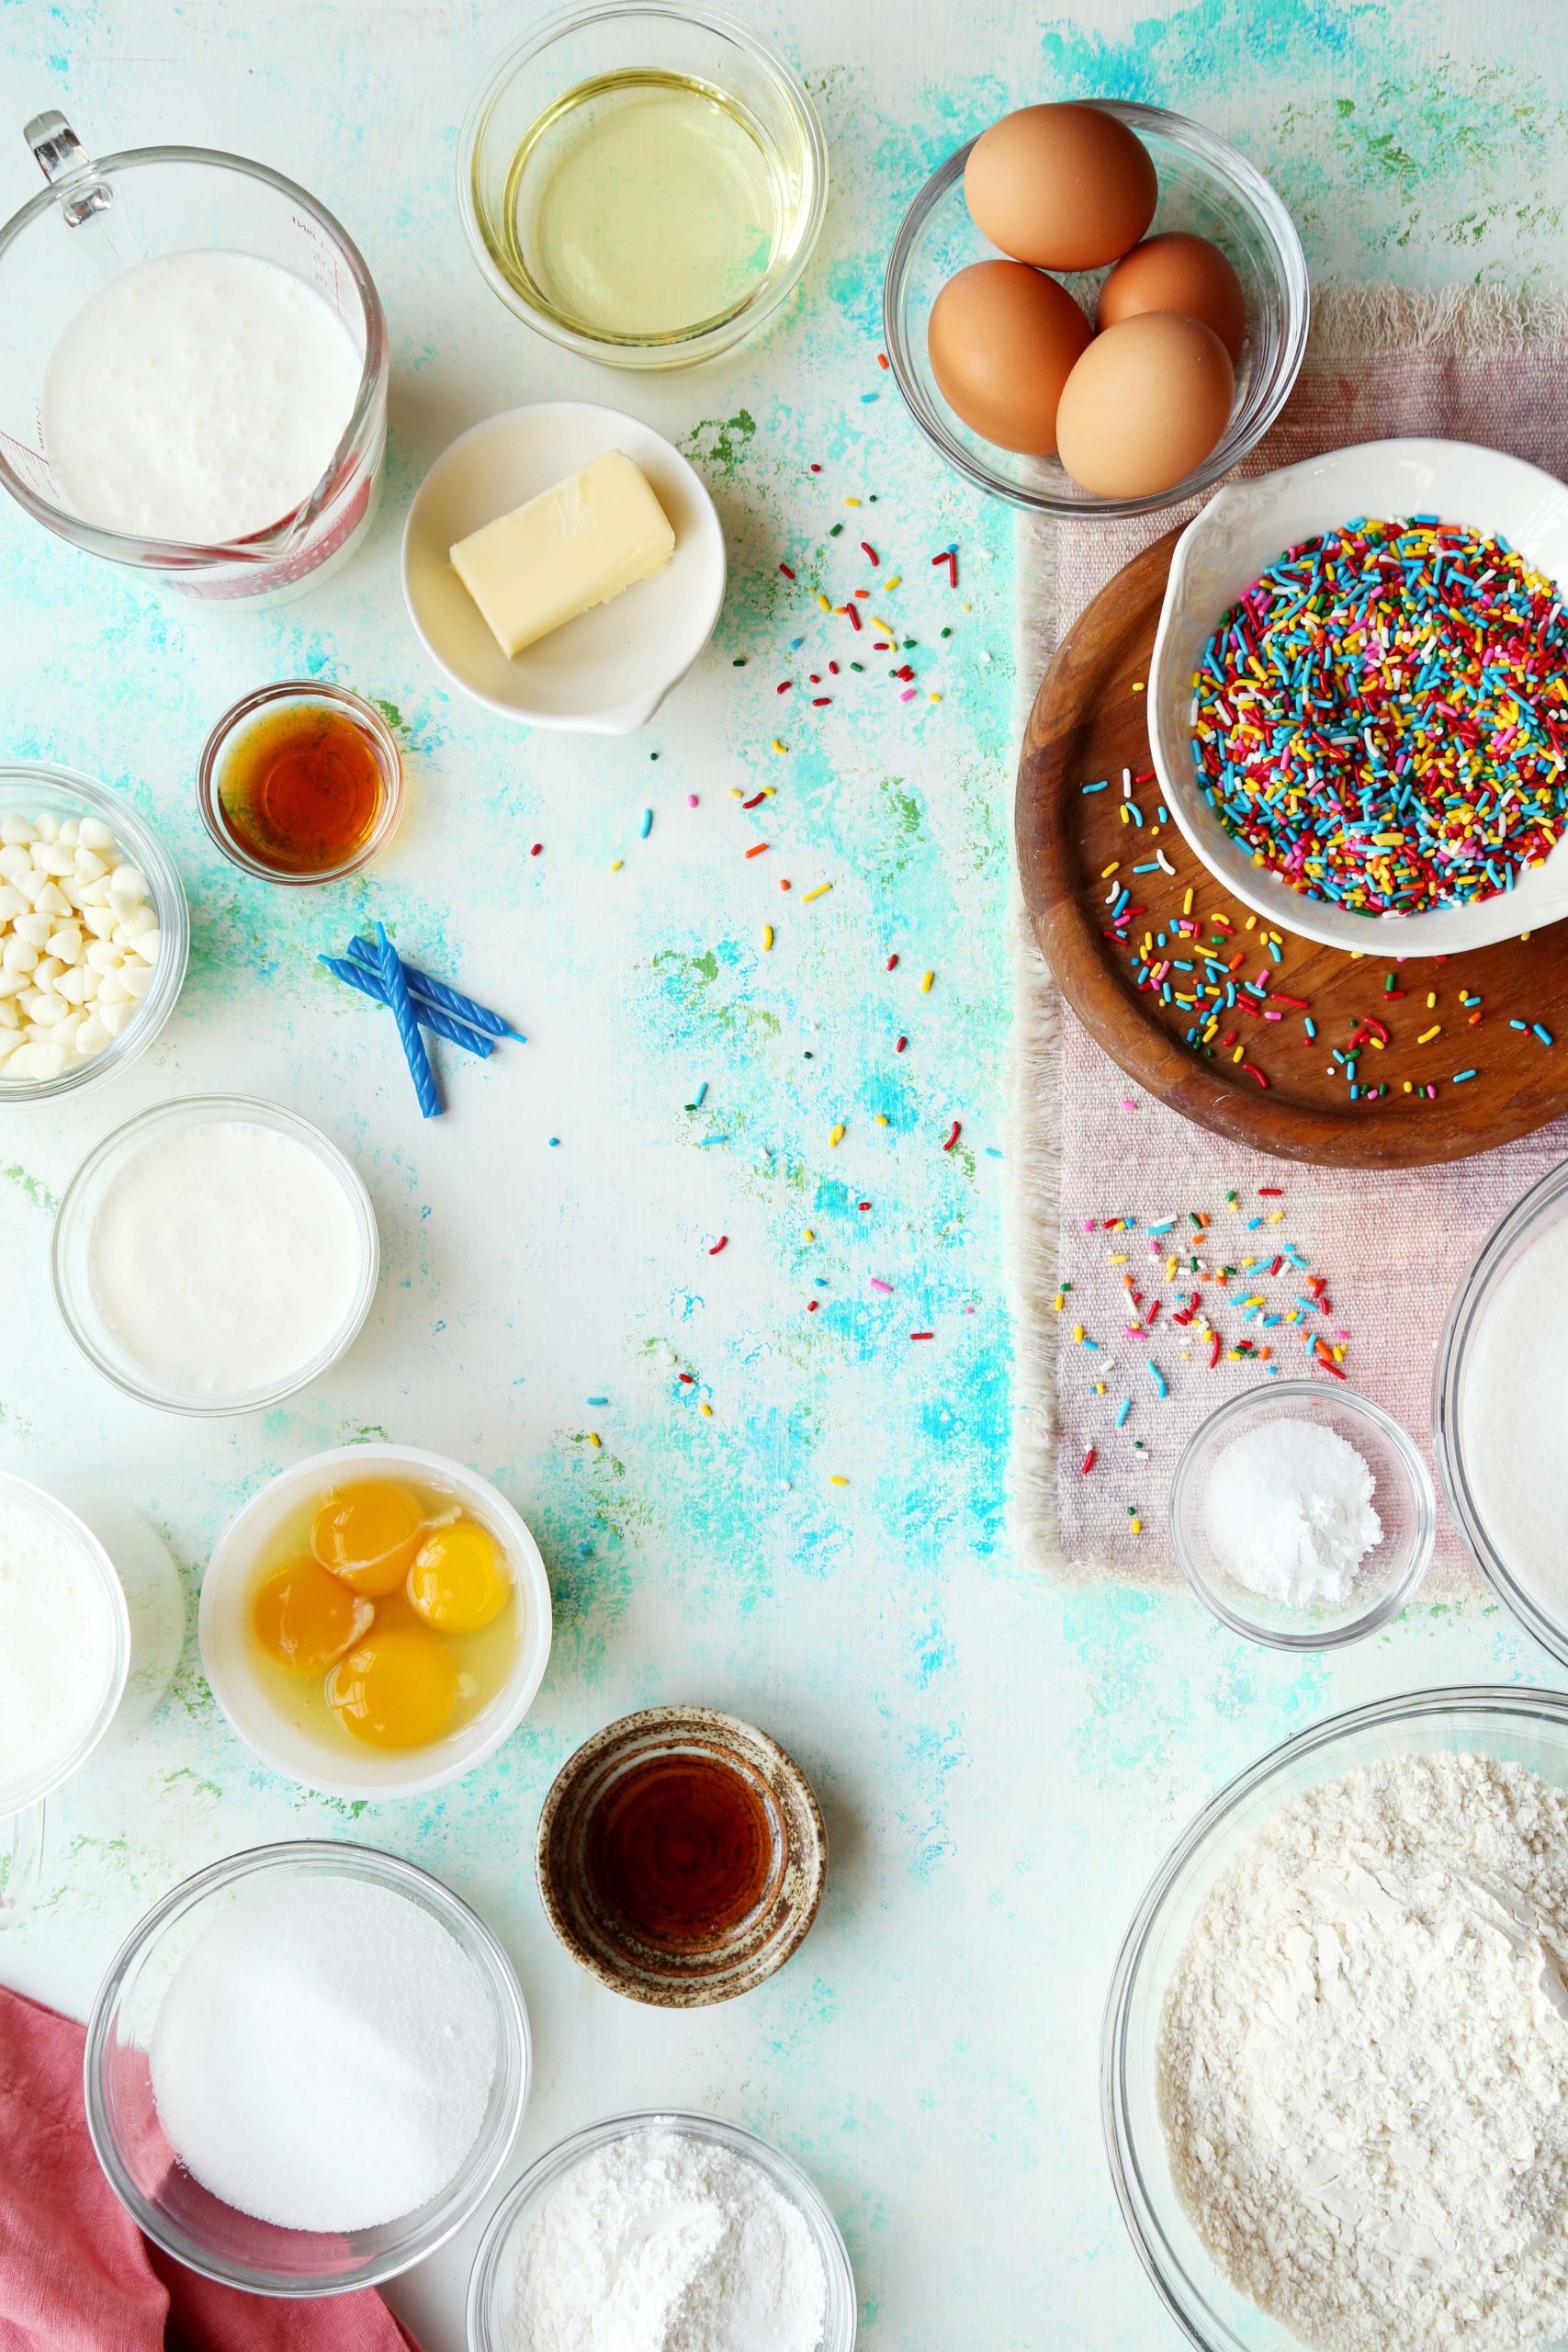
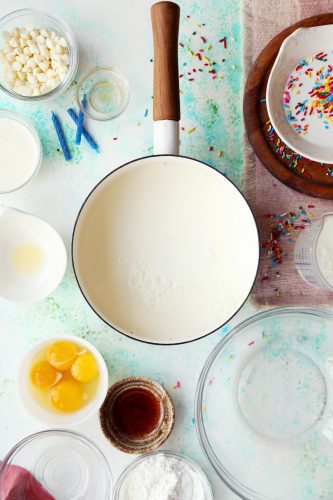
- 2 cups granulated sugar
- 4 large eggs room temperature
- 1/3 cup vegetable oil
- 2 cups all-purpose flour
- 1 1/4 teaspoons salt
- 2 teaspoons baking powder
- 1 cup buttermilk or whole milk
- 1/4 cup 1/2 stick unsalted butter, melted and cooled
- 2 teaspoons vanilla extract
- 1/3 cup multi-colored sprinkles
Filling:
- 2 1/2 cups whole milk
- 1/2 cup granulated sugar
- 1/4 teaspoon salt
- 1/3 cup cornstarch
- 3 large egg yolks
- 1 large whole egg
- 2 teaspoons vanilla extract
Topping:
- 1/4 cup heavy or whipping cream
- 1/3 cup chopped white chocolate or white chocolate chips
- 1/2 teaspoon vanilla extract
- 2 tablespoons multi-colored sprinkles
Instructions
- Preheat oven to 325°F. Grease and flour two 9-inch round cake pans and set aside.
- Beat the sugar and eggs together until they're light and fluffy, about 2 minutes at medium-high speed using an electric or stand mixer. Slowly beat in the vegetable oil.
- Add the flour, salt, and baking powder to the egg mixture and beat until just combined. Use a rubber spatula to scrape the sides and bottom of the bowl to evenly incorporate. In a small bowl or measuring cup, whisk together the milk, butter and vanilla. Slowly add the liquids to the cake batter, mixing until everything is well combined. Fold in the sprinkles. The batter will be very thin, but that's okay.
- Divide the batter evenly among the prepared pans and bake for 30 to 35 minutes, or until a toothpick inserted into the center comes out clean. Remove the cakes from the oven, cool them in the pans for 10 minutes, then turn them out onto a rack to cool completely.
- To make the filling: In a medium-sized saucepan, stir together 2 cups of the milk, the sugar, and the salt. Bring to a simmer over medium heat, stirring to dissolve the sugar. In a separate bowl, whisk the cornstarch, egg yolks, and whole egg with the remaining 1/2 cup milk.
- Whisk some of the hot milk mixture into the egg yolks/cornstarch to temper the yolks. This prevents curdling. Pour the egg/milk mixture back into the remaining simmering milk in the pan, pouring it through a strainer to capture any bits of egg. Bring the mixture to a low boil over medium heat (this may happen very quickly), stirring constantly with a whisk, and cook for 2 minutes; the mixture will thicken significantly. Remove the filling from the heat and stir in the vanilla. Transfer the filling to a heatproof bowl, and top it with a piece of buttered plastic wrap (make sure it touches the top of the filling so it doesn't develop a skin). Refrigerate until cool.
- When the cakes and pastry cream are completely cool, spread the filling in an even layer over one layer then stack the second layer on top. Set aside.
- To make the glaze: Melt the chocolate and cream together until smooth and lump-free. Add the vanilla and stir well. Let the glaze sit for about 10 minutes to cool a bit and to thicken slightly. Pour the glaze over the top of the cake and top with sprinkles along the edge of the cake. Serve immediately or refrigerate until ready to serve. Enjoy!
Notes
Box cake mix is nothing to be ashamed of. It has a very distinct flavor (probably of chemicals but hey ho) that nothing else can match. I have the same fond memories from childhood. I also sometimes use store-bought frosting which is so awesomely bad, I can’t stop. Love this cake.
I have the worlds biggest sweet tooth…so I’m in! Can’t wait to make this!