
I’m going to be completely honest with you all right here, right now. I feel like you need to hear my confession. I’m currently knee deep in denial friends and I can’t help it. It’s not even the good kind of denial, it’s the bad kind. I actually don’t know if there’s a good kind of denial but I feel like there might be, and if this was the good kind I’d sure know about it. So I’ll reiterate, it’s not the good kind. I refuse to believe or even acknowledge that it’s mid-November already. I don’t want to even think about saying it out loud because I feel like if I do, then that’ll make it real. It’ll put it out there and I’m not ready for that kind of permanence. Seriously though, where has the time gone? Where is it heading so fast? Hey time, slow down a bit yeah? Why are you in such a hurry? You’re moving way too fast for my taste. I feel like it was Thanksgiving and Christmas 2012, just yesterday. I keep asking everyone I encounter—from the cashier at the grocery store, to the mailman, even the dog on the street—”Can you believe it’s almost the end of the year already?!” They responded to me just as shocked as I was, except of course for the dog. He just looked at me and tilted his head to the side. Probably thought I was a piece of bacon or something. The sense of time lost on him no doubt. Memo to myself, I need to think more like a dog and lose my sense of time. Added to my to-do list.
The thought that Thanksgiving is just around the corner is giving me anxiety and it’s starting to sink in. It’s creeping up fast and I have not yet begun to prepare myself for this gigantic holiday. Don’t get me wrong, physically I’m prepared. I’m always ready to eat large amounts of delicious turkey and sides and pie until I can’t move anymore and all I want to do is take a nap or eat some more. (Whichever comes first.) If I could, I’d do that everyday of my life. I’m totally kidding (but not really). Thanksgiving happens to be my favorite holiday—just in case you didn’t already know that—second of course to the 4th of July. But we’ll save that conversation for another time. This isn’t a 4th of July post. So at the moment Thanksgiving is my favorite holiday. That’s all you need to know. Someone might need to slap me a couple of times to shake me out of this trance though. My mind still thinks it’s summer, and I have the unusually warm weather here in LA to thank for this. It’s mid-November, it shouldn’t be this hot! Get it together California, you’re killing me!
As my mind tries desperately to get into the right mindset for the upcoming holidays, I decided to let this post give me the inspiration and boost I’ve been looking for in order to prepare myself for all the cooking and eating (and eating) that’s sure to come soon. I figured that if I used ingredients typically found around the Thanksgiving table, I’d be able to get inspired and get my act together. So I bring to you this Brussels Sprouts and Apple Quiche. I think it screams Thanksgiving without beating you over the head with it. It’s more like “Oh hey, morning after Thanksgiving meal! You look mighty tasty,” instead of, “Oh wow this is like Thanksgiving exploded all over the place,” and that’s something I can totally get behind. I don’t know if this post really helped or not. Just continue to lie to me. Let me be in denial for a few more days. I’ll deal with it next week, but for now I’m going to eat this quiche and pretend that it’s not, absolutely not, mid-November and I think you should do the same. We’re all better off this way.

We’re going to start off by making the most important part of this recipe. The crust.
Although it’s the most important part, and the whole entire recipe depends on this one part coming out right (no pressure) it actually happens to be super easy to make. You can make this by hand and not even break a sweat. That’s how simple it is.
You start with a bowl of flour. Just plain everyday all-purpose flour. Nothing out of reach. Nothing too crazy. We’re keeping it really simple this week.


Then you add the salt and chives and give it a stir with a fork, or a whisk. Sure, you can use your bare hands if you want. I won’t say no.

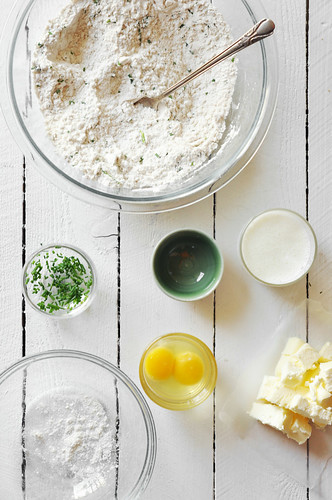
We’re then going to add in the very cold butter.
Remember in all those other crust posts (like the last two in particular) I told you about how cold butter creates a flaky and perfect crust? Well it’s the same here. No different. Make sure the butter is super duper mega cold.
**Tip: I like to dice the butter and then place it in the freezer until ready to use. This will ensure the butter stay cold. I happen to like flaky and airy crusts which is the way they should be. Am I right ladies and gentlemen? Eh eh eh?**
I’ve digressed though, which is weird because that totally never happens to me. I’m always right on track. I blame you for distracting me. It’s all your fault. I knew you would do this to me!
Back to the post, once you add the butter, use a fork, two knives, a pastry cutter, or your fingers to work it into the flour. You should break it down until the butter resembles coarse crumbs, the size of peas.


Up next, we’re going to add in the wet ingredients. We have one whole egg and one egg yolk. Give the eggs a light whisk in a small bowl.
Then add in the buttermilk to the beaten eggs and give it another whisk. It doesn’t have to be completely incorporated, just enough to combine them.


Pour the buttermilk and egg mixture into the center of the dry ingredients.
Using a rubber spatula, carefully mix until the dough comes together. Then use your hands to really form it into a ball. If the dough appears to be too dry, add a bit more buttermilk.

Form the dough into a disk and wrap it tightly with plastic wrap. Place in the fridge and allow to chill for at least 30 minutes but an hour would be best. Don’t look at me with that, “Awwww, an hour??!?!” look. It’s better in the long run. Trust me. Don’t you want delicious crust to eat later on? Don’t you want your quiche to be a success? Don’t you want an eye dropping, show stopping, booty snatching (kidding about that one, just making sure you’re awake) meal?

While the dough is chilling, let’s turn our attention to the filling. The veggie-filled-good-for-you filling. I’m still on this vegetarian kick, as of late, but I’m going to be completely honest with you because I think I owe it to you. Each and everyone of you. We’ve known each other for far too long enough, so I need to be honest. In all honesty I’m just trying to impress a vegetarian. Sort of like a, “See? I can cook really good vegetarian food! Now let me steal you away.” That’s not freaky or weird in the slightest right? I thought not.
We’re going to need Brussels sprouts for this, as the title likes to point out. I mentioned to you before in the old post that I LOVE Brussels sprouts and I don’t know why many people don’t. It’s a shame. Poor little Brussels always get looked down upon. They’re very delicious. I think the key is in cooking them right. This here, is cooking them right.
Bring a pot of water to a boil, lightly salt it and then throw in the cleaned, cut and trimmed Brussels sprouts.
**Note: What we’re doing here is called blanching. No this is not a Golden Girls reference. This is when you partially boil something (usually always refers to a vegetable) just for a few minutes and then you immediately stop the cooking process by dumping the boiled veggies into a bowl of ice cold water. The shock of temperature will ensure bright colored veggies and prevent them from over cooking!**
So those Brussels are boiling for a few minutes. Once fork tender, using a slotted spoon, transfer the sprouts to a bowl of ice cold water. Leave them there to cool.


After they are completely cooled, drain the sprouts and let them hang out to air dry in the colander. Forget about them. But don’t get too excited, you’re only forgetting about them for a few moments. We’re not leaving them out completely from the dish. Although I’m sure you’d like that wouldn’t you?!?
Up next: more veggies.
Heat a heavy skillet over medium-high heat. Throw in the butter and allow it to melt.


Add the sliced shallots and sauté for a few minutes until they begin to soften. Stir constantly so that they do not burn. You don’t want them to burn. Burning would be bad. We don’t operate that kind of kitchen!
**Note: Shallots are a cross between an onion and garlic. If you’re not a big yellow onion fan, because you think the flavor is too overpowering or something, then try using a shallot instead. It’s much more of a mild onion flavor profile but you still get that wonderful aroma and taste. Without the tears.**


We’re now going to do the same thing with the chopped garlic. Add it to the skillet and cook for 1 to 2 minutes. Again, make sure the garlic or shallots don’t burn.


Once the garlic and shallots are just beginning to brown and they’re aromatic, you can add the blanched and somewhat (air) dried Brussels sprouts to the pot. Give it a good stir to evenly coat in the butter and give the sprouts a chance to start browning.
**Note: Make sure the Brussels sprouts are somewhat dry and drained of most of the water before you add them to the skillet. Too much moisture will prevent them from browning properly. You don’t have to kill yourself in trying to make sure they are completely dry. Somewhat dry is fine.**


Spread them out on a single layer in the skillet and allow them to cook, untouched, for a few minutes. Then toss them around and allow the other sides to brown. It should take about 6 to 8 minutes. Make sure to keep an eye on them every so often, you might have to lower the flame a bit to ensure they don’t burn.
Season with salt, pepper, crushed red pepper flakes (optional if you like a little heat) and nutmeg.
**Tip: Use freshly grated nutmeg if you can find some. I always add a bit of nutmeg whenever I’m cooking green veggies like this, or spinach, kale, or any of those greens (mustard and collard). I feel like it brings out their flavor a bit. Try it out next time.**


While the Brussels sprouts are doing their thing, core a few apples and dice them into a small to medium dice. You can peel the apples if you’d like but I didn’t. One, because I like the look of the red skin in with the rest of the veggies, and two, because I was super lazy to peel them apples. Ain’t no one got time for that. That’s the real reason folks.
**Note: You can really use any apple you’d like in this. Whatever you have on hand or is available to you. I used a Braeburn apple. So if you can find that apple variety in your local super market well then, I highly recommend it. But like I said before, any apple will do. The sweetness from the apple compliments the other ingredients in the recipe very well!**
Add the diced apples into the skillet.


Don’t cut the apples so small that they’ll disintegrate while they cook. You don’t want them to turn to mush. So I like to cut them into slightly bigger chunks so that they keep their shape during the cooking and baking process.
Give it all a good stir and cook for about 2 to 4 minutes. Remove from the flame and allow to cool off to the side.

Let’s turn our attention back to the dough for our crust! We can’t forget about that because people will get really mad if we do, and by people I of course mean me. If this quiche had no crust, it’d be a frittata basically and I’d flip a table over because I want some crusty quiche. I didn’t sign up for a frittata.
Lightly flour a work surface and grab yourself one of those tart pans with the removable sides. You know the kind?
Roll out the dough into a large circle about half of an inch thick.


Place the rolled out dough into the tart pan, making sure to get into the corner and sides of the pan.

Using a sharp paring knife, trim the excess dough. I like to run my rolling pin over the top of the pan to cut off the excess dough so as to create an even and clean looking tart. Does that make sense? I think I just confused myself with that sentence and I don’t know how to fix it so guess what, I’m going to leave it. Hopefully you got that though. Basically make the tart look nice.


Okay your tart crust is almost ready and good to go into the oven. Using a fork, prick holes all over the tart and don’t forget about those sides. This will prevent the dough from puffing up and rising in the oven while it bakes. You can also use a wooden skewer but that would only make one hole at a time and that would take way too long. So that’s why I like using a fork because you get to make four holes at a time.

Place the crust, at this point, in the fridge for 30 minutes to chill or in the freezer for 15 minutes. Shhhhh don’t tell anyone I told you about that freezer trick.
Last step is to cover this bad boy up with parchment paper and then load it up with some kind of weight. They sell pie weights specifically for this type of thing, but who has pie weights really? I just use dry beans. It does the same thing. It’s a good idea to cover the crust while it bakes so that it doesn’t brown too quickly. The weight from the beans will prevent the crust from puffing up as well.

Bake this in a preheated 350°F oven for about 20 minutes, covered. Then remove it carefully from the oven and remove the parchment paper and weights (beans). Return the crust to the oven and bake for another 10 minutes or until lightly golden.
**Note: Keep in mind that this will bake once more once we add the filling, so make sure it doesn’t get too browned during this initial baking. If you find that it is browning rather quickly lower the oven temperature and bake for less time.**
Remove from the oven and allow to cool completely before filling.
Okay, now we are reading to fill this tart with all sorts of delicious things.

So many people have a common misconception with quiche. They think it’s all about the eggs. That there are like a dozen eggs in a quiche. That’s nothing but fallacies. Quiche is actually more milk/cream/half and half than it is about eggs. This one actually only has three eggs in the filling.
Pour the eggs into a large bowl. Okay, I lied. A medium bowl. Then pour in the half and half.


Season with salt and freshly cracked black pepper. Give it a good whisk until completely combined.

Arrange the cooled veggies on the bottom of the baked crust. Spread it out evenly and make sure it’s in a single layer.
**Note: You might have a little extra filling leftover but have no fear. I know exactly what to do with it! You’re going to need a fork and an appetite. Then you just dig in and eat it! You’re welcome. I’m looking out for you, really. You should thank me.**
Then pour in the milk and egg mixture into the crust over the sautéed veggies.


The liquid will reach the top of the crust. Do not panic. That’s okay. It will all work out. Top the filling with shredded gruyere cheese.
If you can’t find gruyere, then you can definitely use whatever kind of cheese you’d like. Or whatever you have on hand. 
Carefully transfer the tart to a baking sheet, this will make transporting the tart in and out of the oven a lot easier. But also, it will prevent any spillage. Although you won’t really have to worry about that. No spillage will occur. But you never know. So it’s better to be safe than sorry is what I always say. I don’t really always say that, but I should totally start to because it’s so true.

Bake the quiche for about 30 to 35 minutes or until puffed and golden brown on top. I like to rotate the tart halfway through baking to ensure even browning.

Allow to cool for at least 30 minutes before slicing into it and serving. I know that sounds like torture (a nightmare really) BUT those 30 minutes of resting are crucial. It will make sure the quiche settles and will make it a lot easier to cut into. I like eating quiche at room temperature or slightly warm so it works out for me. After the 30 minutes it will still be warm but if you want it hotter, then pop it back into the oven for about 5 minutes to heat through.
Remove the tart by lifting the bottom off the sides. That’s if you have one of those removable tart pans. You can make this quiche in a deep pie dish if you’d prefer, or if that’s all you have on hand go ahead and make it in that. It will all be the same.

Cut and serve right away with the rest of your breakfast or brunch items. This is great with a side salad or roasted potatoes if you feel like being naughty. You can also serve it alongside cut up fruit if you want to be boring healthy. While quiche is typically a breakfast/brunch item, I happen to love it for dinner. You should already know about my love of breakfast for dinner, so I’ll take any excuse to make breakfast recipes for dinner. But I also enjoy this recipe because it’s super fast to whip up.

You can easily make this any night of the week. Especially on those days when you’re super tired from work. You can prep a couple things before hand on the weekend, to make it even easier for you. For instance, make the crust a few days ahead and just keep it wrapped in the fridge. Thaw it out a bit before rolling and then stand back and watch dinner practically make itself. You can also sauté the filling and have it in the fridge ready to go for when you put the quiche together later in the week. Of course if you don’t want to make this for dinner, then by all means make it on the weekends for a brunch or breakfast gathering. Your family will love this. You’ll get them to eat lots of fruit and veggies and the best part is that they probably won’t even realize that this is loaded with Brussels sprouts. You’ll get them to eat healthy without even realizing it. Both my mom and one of my sisters claim to hate Brussels sprouts and didn’t even know they were eating them in this dish. Proof enough? I think so friends, I think so.


For the vegetarians out there I hope this recipe is right up your alley. I hope that you make it and what’s more, I hope you enjoy it. For all the meat eaters out there (including myself) you have to still make this because I promise you, you won’t miss the meat. You won’t even realize that it’s missing. But at the same time I’m totally with you on needing meat sometimes so if you feel like you just want something more in this you can definitely add some chopped crisped bacon or sausage to the filling. I won’t tell anyone, I promise. Cross my heart and kiss my elbow. Just share some with me though and then I’ll keep your secret. Enjoy!

[print_this]

Brussels Sprouts and Apple Quiche
Sometimes we all just need a good vegetarian meal every now and then. Most of the time we don’t have all the time in the world to cook really elaborate meals for ourselves or our loved ones. I have the answer for both those cases. This quiche. That’s the answer. It’s loaded with veggies that are good for you. You won’t miss the meat at all, okay maybe a little bit. It’s a simple recipe that you can pull off any night of the week. Don’t have time to make the crust? Make it a day in advance or you can just buy store bought crust in the freezer section. I’ll keep that a secret as well, don’t worry. Feel free to swap out some of the veggies for your favorite. This recipe is easily customizable so you can make it just the way you’d like!
yield: 8 servings
Ingredients:
- 3 tablespoons unsalted butter
- 2 medium shallots, peeled and thinly sliced
- 4 garlic cloves, minced
- 1 pound Brussels sprouts, trimmed and quartered
- 1 teaspoon salt
- 1 teaspoon freshly cracked black pepper
- ½ teaspoon crushed red pepper flakes (optional)
- ¼ teaspoon freshly grated nutmeg
- 2 medium apples (such as Braeburn or gala), cored and diced
- 3 large eggs
- 1½ cups half and half
- ½ teaspoon salt
- ½ teaspoon black pepper
- ¼ cup freshly grated gruyere cheese
- 1 savory chive crust (recipe follows)
Preparation:
1. Preheat oven to 350°F.
2. On a lightly floured work surface roll out the crust dough to a large circle (enough to cover and fit into a 9-inch tart pan). Place into a removable bottomed tart pan or a deep dish pie plate. Trim the excess hanging dough and even out the top with the edge of the pan or crimp the dough, if using a pie dish. Poke holes throughout the top with a fork. Cover with a piece of parchment paper and fill with dry beans or pie weights. Bake for about 20 minutes covered. Carefully remove the beans or weights and parchment paper. Bake for another 10 minutes or until lightly golden brown. Remove from oven and allow to cool.
3. Bring a large pot of water to a boil. Lightly season with salt and throw in the cleaned and trimmed Brussels sprouts. Boil for about 5 minutes or until bright green and tender. Using a slotted spoon transfer the Brussels sprouts to a bowl of ice water. Leave there to cool completely. Then drain into a colander and allow to air dry.
4. Heat a large skillet over medium-high heat. Melt the butter and add the sliced shallots and minced garlic. Cook for about 5 minutes, stirring constantly, until tender and just beginning to brown. Add the drained Brussels sprouts, stir and cook for about 5 to 8 minutes or until they brown. Season with salt, black pepper, crushed red pepper flakes and nutmeg. Stir every once in a while, keeping an eye on them so that they don’t burn. You might have to lower the heat. Add the diced apples and cook for another 2 to 3 minutes. Remove from flame and allow to cool.
5. In a large bowl whisk together the eggs and half and half. Season with salt and pepper and whisk once more until completely combined. Arrange the sautéed veggies on the baked and cooled crust on a single layer. Pour the milk and egg mixture over the filling. Sprinkle with shredded gruyere cheese. Place the quiche on a baking sheet and bake for about 30 to 35 minutes or until puffed and golden brown. Remove from the oven and allow to cool for about 30 minutes to set. Cut and enjoy!
[/print_this]
[print_this]
Savory Chive Crust
Adapted from Martha Stewart Living.
You can swap out the chives in this recipe if you’d like for another herb like thyme, rosemary or parsley. You can even add other ingredients like black pepper, shredded cheese or bacon if you’re feeling adventurous. It’s the perfect recipe to make ahead and keep stocked in your freezer or fridge, for whenever you want a quick weeknight meal. Just thaw out before rolling.
yield: 1 tart or pie crust
Ingredients:
- 1¾ cups all-purpose flour
- ½ teaspoon salt
- ¼ cup chopped chives
- 9 tablespoons (1 stick and 1 tablespoon) unsalted butter, cold and diced
- 1 large egg, plus 1 large egg yolk
- ¼ cup buttermilk, chilled
Preparation:
1. In a large bowl, whisk together the flour, salt and chives. Add the cold diced butter and rub with your fingers (or a fork or pastry cutter) until it resembles coarse crumbs the size of peas. In a small bowl, lightly whisk the egg, egg yolk and buttermilk together. Pour into the center of the dry ingredients and mix with a spatula until the dough comes together. Use your hands to form into a disk. Cover tightly with plastic wrap and chill in the fridge for about 1 hour.
[/print_this]
Looks amazing!
I love the look a dog gives you when you’re talking to them and they have no idea what you’re saying… You can see them trying to figure it out, but they never quite get there.
I don’t want it to be mid-November already either! It’s CRAZY! Thank goodness for comfort food to save us, haha. Love this quiche – the flavour is unique and the photos are gorgeous!
This looks absolutely sinfully good! I’m a total Brussels Sprout person and everything in this recipe says Eat me right now to me!! 😀 can’t wait to try it
Hilarious. So I found myself making ice cream this morning (although it’s about 4 degrees out where I live), also in denial about the fact that I need to be whipping out some Thanksgiving sides to share on my own blog. But now I feel totally inspired to eat a million Brussels sprouts and act like it’s November!
Your post made me super hungry!!!
I’m also in denial about how close it is to Thanksgiving. Thanks for the pie crust tips. Just curious but what do you do with the beans after baking them?
Apple in my quiche sounds so ridiculously good, it’s definitely on my top ingredient list to add in next time I make some quiche. And that crust sounds divine too 😀
My fiancé doesn’t like cheese very much (I know). Would this work, or still be good, without the sprinkling of gruyere?