
I’d never tried Ben and Jerry’s ice cream until I met Julian a couple years ago. It’s his favorite ice cream of all time. I don’t know how I went through my entire 26 years of existence without trying this deliciously irresistible treat. I guess you can say I was missing out on something incredible, on both aspects of my life. Needless to say, when I took that first bite of Ben and Jerry’s, I became hooked, instantly. Obsessed isn’t really an appropriate word to throw around. I feel like that doesn’t adequately describe my feelings for this icy cold dessert, so I won’t call it an obsession. I change my mind. Instead, let’s refer to this newfound love affair of mine as an admiration. I think that sounds better, don’t you? I still remember that first flavor I tried, Cinnamon roll. I picked it out of the crowd because cinnamon rolls are one of my favorite desserts, so I thought to myself, “Why not try a cinnamon roll flavored ice cream, Jonathan?! That sounds like the greatest thing ever invented.” So I picked it up and never looked back. After eating the entire tub in less than five minutes, I remember thinking I found my new favorite ice cream flavor, and nothing could change my mind. Nothing. As far as I was concerned, I’d only ever have eyes for that cinnamon swirl and no other ice cream could make me think otherwise. Then one day I needed to get my fix so I took a trip to the grocery store and the most horrible thing happened. All of the cinnamon roll Ben and Jerry’s was gone. GONE. Nowhere to be found. I almost cried. Okay, I cried. After I gathered myself together, I picked up chunky monkey instead (thinking ugh, what a subpar choice) and I instantly forgot about the other one. What was it again? I can’t even name it anymore. It isn’t worth it. Chunky monkey is life.
Confession time: This is actually the first time in my life that I’ve ever made sticky buns before. I know I know, I’m over here going on and on about sticky buns as if I’m some sort of sticky bun expert or something. Is it possible to become an expert after only making something once? Yeah I think so. Maybe I’m just saying this because I wan’t to be referred to as an expert of some sort. It’s been a life goal of mine and I think with this post I’ve earned it. (Humble brag). I’ve been wanting to attempt a sticky bun recipe for a very long time now, but something kept me from it. I think it’s the whole making of the caramel and inverting of the buns that really scared me. I still get nightmares every now and then. Plus I kept reading all these scary reviews online of people and their horror stories involving dry buns. That’s tragic. I remember thinking, how can sticky buns be dry? I didn’t have the strength or the courage to overcome that fear so I just kept putting it off. Until the other day when I was trying to figure out what to make and photograph for my post, to share with you guys. I started brainstorming all sorts of different ideas and this one crazy idea just wouldn’t go away. All of a sudden I was envisioning some sort of chunky monkey dessert. Mainly because I was really craving a pint of chunky monkey, but also because I love the flavor profiles, which deserve to be showed off all day every day.
Too many sticks of butter, a couple pints of heavy cream and a lot of brown sugar later, I came upon the ultimate sticky bun recipe and still wasn’t sure if it would go over well. I shared a few photos on instagram and it’s almost like you guys read my mind because you reassured me that everything was going to be alright. Y’all went nuts over a vision I got in passing and it made me realize that I should really listen to my instincts more often. It’s like my mamma always says, “You should always go with your first choice.” And so from now on that’s what I’m going to do, although sometimes my first instinct is to deep fry everything and somehow that doesn’t seem right…or healthy. So maybe I’ll practice this new rule in moderation. One thing that I won’t censor and moderate are these Chunky Monkey Cinnamon Rolls because I’m now convinced that this would be my last meal on earth. An entire pan right out of the oven because there’s nothing better than this in the entire world. Nothing.

We start by making the dough for our sticky buns. This is somewhat of an easy dough, but if you’re totally against baking and don’t really like to do it, then this is probably a somewhat difficult dough to make and work with. The good news is that I’ll be here guiding you every step of the way, providing moral support and funny anecdotes here and there (like always).
In a small bowl, combine a bit of warm water, sugar and yeast. Allow to sit for about 10 minutes, in a warm place until foamy.
**Note: If your yeast mixture doesn’t foam up, toss it and start over. It’s important to awaken the dry yeast. Warm water will do that, just make sure the water isn’t too hot that you’ll kill the yeast (murderer!!) but also at the same time, if the water isn’t warm enough, nothing will happen. While we’re on the topic, yeast is like you and I. It needs food. The sugar is food for the yeast, so don’t omit that little pinch.**
While the yeast foams up, beat together the butter, sugar, milk powder and salt for about 5 minutes. Then add in eggs, one at a time.

**Note: Dry milk powder gives this bread a great taste and texture, I highly recommend you use it. Most major grocery stores carry it, but if you can’t find it, here’s a link online where you can buy as much as you’d like!**
After the eggs, add in the rest of the water and the yeast mixture. Mix until combined. The mixture will look curdled, that’s okay. Just proceed to the next step. Add in the flour one cup at a time.

Continue adding the flour and mixing after each addition, until the dough comes together. It’ll be a very sticky dough, so keep that in mind. Transfer to a floured work surface and knead until soft and smooth.
**Note: This is a very sticky dough, keep adding flour and kneading until it’s soft and smooth, about 5 to 8 minutes.**

Place dough in an oiled bowl, turning it over to coat both sides, and cover loosely with plastic wrap. Cover with a damp kitchen towel on top and store in a warm place to double in size, about 2 and a half hours.
**Tip: You can do this the night before and allow it to sit in the fridge. Allow it to come to room temperature and sit in a warm place for about 3 hours until doubled in size.**
While the dough rises, let’s make the walnut caramel topping. Melt the butter in a sauce pot or large skillet. Add in the heavy cream, brown sugar, honey and salt.

Stir to evenly combine and bring to a simmer. Allow to cook, on medium, for about 3 to 5 minutes until browned and somewhat thick. Remove from heat and stir in the vanilla extract.

Pour half of the caramel onto the bottom of a 9×13-inch rectangle baking sheet. Top with crushed walnuts.
**Tip: Since chunky monkey is made with walnuts, that’s why I’m using them, but if you prefer pecans, go ahead and use that instead.**

Transfer the remaining caramel to a small bowl and set aside. Set the pan aside as well because we don’t need it right this moment. Let’s now turn our attention to the banana filling for these sticky buns.
In a large skillet, melt the butter. Add the brown sugar, heavy cream and salt. Bring to a simmer and allow to cook for about 5 minutes. Add in the sliced bananas and cook for another 1 to 2 minutes on medium.

**Tip: You can add alcohol (like rum or bourbon) to the bananas and SAFELY ignite the mixture on fire like in those fancy restaurants. Or if you love your hair and eyebrows too much like I do, then you’re better off just omitting that entire step altogether. Add vanilla instead, away from the heat.**
Set the bananas off to the side and allow to cool down. By now, if you’ve timed it all right, the dough should be ready to go.

The dough should’ve doubled in size and be the softest dough you ever did feel. Like a pillow. Like a soft pillow. Take out the dough from the bowl and transfer it to a well floured work surface. Roll it out into a large rectangle, about a quarter inch thick and then drizzle the bananas and a bit of the sauce they cooked in on top of the rolled dough.

**Note: If you don’t want your buns to be too dry in the middle, you can drizzle in more of the banana caramel sauce. You don’t want to over do it though, because it’ll make it difficult when you go to roll the dough into a log. Think about that.**
Don’t forget that chunk monkey is all about the chocolate chunks. So of course, we’re going to add chocolate chunks to our rolls as well. I’m using dark chocolate, but feel free to use whatever you prefer.

Carefully, and trying hard to keep the caramel inside, roll the dough into a tight log (lengthwise). Keep rolling into a long log of dough is formed, pinching at the seam to seal it shut.

Trim off the ends of the dough log to even it out and then cut in half. And then cut each half in half once more, so you end up with four even pieces. Then cut eat piece into thirds so you end up with twelve even pieces. Place the rolls, cut side down, in the baking pan on top of the walnut caramel layer.

Place them in there snuggly so that they’re touching. It’s better when they touch. Cover the pan loosely with plastic wrap and a damp kitchen towel. Allow to rest in a warm spot for about 1 hour or until doubled in size.


Bake in a preheated 325ºF oven for about 35 to 40 minutes or until deep golden brown on top. Remove from oven and run a knife along the sides of the pan. Allow to cool for a couple of minutes.

Once it has cooled for a minute or two, carefully place a baking sheet or platter (big enough to cover the pan) over the buns. Then safely without burning the living daylights out of yourself, turn everything over and allow the buns to fall out of the pan.
**Tip: You want to invert the sticky buns while they’re still warm because it’ll make it easier, allowing the buns to slide right out due to the fact that the caramel is still warm.**

Once inverted, you can spoon over the reserved caramel from earlier. Remember how we saved half of it when adding walnuts to the bottom of the pan? Well that was for this instance. We needed a reason to spoon more of this delicious brown sugar and heavy cream and butter concoction on top of an already sinful bun. If you have more walnuts, you can sprinkle some more on top at this point as well.

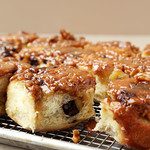
These sticky buns are best served warm because I mean what is there not to like about warm sticky buns that are still so soft and covered in caramel and walnuts? Plus, you’ve waited this long to make them, don’t you just want to dive in already?

You can cover these with plastic wrap and keep them at room temperature for about 2 to 3 days or you can store them in the fridge and keep them for up to 5 days. Just rewarm them in the oven or microwave for a few seconds before eating. It’s nice that you can go through all of the trouble and whip these up ahead of time and still enjoy them later on with just a few easy steps to rewarm them. Nothing too complicated.


If you’re not feeling the sticky buns part of this recipe, ie the topping. You can totally omit that part and just make these as cinnamon rolls. They make perfect classic cinnamon rolls by adding the walnuts to the filling instead of the topping. Then you can just spread the finished golden brown buns with a bit of cream cheese glaze. Need a recipe for the glaze? Try our The Classics: Cinnamon Rolls


I’m going to give you a fair warning that while yes, there are a lot of steps, maybe more than you’re used to, but they’re totally worth it. It takes a lot for me to become obsessed to one of my posts, but I have to tell you that I’m going crazy for these sticky buns. They’re perfectly moist and just the right amount of sweetness. I’m not the biggest fan of super sweet desserts so I like finding somewhere it isn’t so bad.


Since this is inspired by the Ben and Jerry’s ice cream flavor, my all-time favorite Ben and Jerry’s ice cream, I figured it would be the best of ideas to share a photo of the ice cream. For no other reason than to show it off, and so that you can see that these buns are related to that ice cream flavor. Maybe it’ll convince you to make these rolls over the weekend. I hope so. Now, if you’ll excuse me I have a few chunky monkey cinnamon rolls to devour. They’re calling my name and I can no longer ignore them. Enjoy!

Chunky Monkey Sticky Buns
Ingredients
For the dough
- 4½ teaspoons 2 packets active dry yeast
- 1 cup warm water
- ⅔ cup granulated sugar
- ½ cup unsalted butter softened
- ½ cup dry milk nonfat milk powder
- 1 teaspoon salt
- 2 large eggs
- 1 teaspoon vanilla extract
- 5 to 6 cups all-purpose flour
For the walnut caramel topping
- ½ cup 1 stick unsalted butter
- ¾ cup light brown sugar
- ¾ cup heavy cream
- ⅓ cup honey
- pinch of salt
- 1 teaspoon vanilla extract
- 1 cup walnuts
For the banana filling
- 4 tablespoons ½ stick unsalted butter
- ½ cup light brown sugar
- ¼ cup heavy cream
- pinch of salt
- 3 bananas thinly sliced
- ½ teaspoon vanilla extract
- 1 cup dark chocolate chunks
Instructions
- For the dough, in a small bowl combine ¼ cup warm water, pinch of sugar and yeast. Stir and allow to rest in a warm place for about 10 minutes, or until foamy. If it doesn't foam, toss and start over.
- In a large bowl, cream together the butter, sugar, milk powder and salt until evenly combined. Stir in the eggs, one at a time, and vanilla extract. Add the flour, one cup at a time, stirring well after each addition. Dough will be sticky. Turn out onto a floured work surface and knead by hand for about 5 minutes until soft and smooth, adding more flour as needed. Place the dough in a greased bowl, turning it over to coat both sides. Cover lightly with plastic wrap and a damp kitchen towel and place in a warm spot for 2½ hours or until doubled in size. Can be refrigerated overnight. Place in a warm spot for 3 hours or until doubled, if refrigerated.
- To make the caramel walnut topping, heat a large skillet or pot over medium-high heat. Add the butter and allow to melt. Stir in the brown sugar, heavy cream, honey and salt. Bring to a simmer and cook for about 3 to 5 minutes, until browned and somewhat thick. Remove from heat and stir in the vanilla extract. Pour half of the caramel into the bottom of a 9x13-inch baking pan, tilting it to completely cover the bottom. Top with walnuts, sprinkling them evenly into one single layer. Set to the side. Reserve the remaining caramel for later.
- To make the banana filling, heat a large skillet over medium-high heat. Add the butter and allow to melt. Stir in the brown sugar, heavy cream and salt. Bring to a simmer and allow to cook for a few minutes until browned and thickened, stirring often. Throw in the sliced bananas and cook for 1 to 2 minutes to softened. Remove from heat and stir in the vanilla extract. Set to the side and allow to cool down.
- Preheat oven to 325°F.
- Once dough is ready, transfer to a well floured work surface. Roll out into a large rectangle about a ¼ of an inch thick. Drizzle with the bananas and the caramel they cooked in, using as much as you'd like. Sprinkle with dark chocolate. Roll the dough into a tight log, lengthwise, making sure to seal the seam by pinching it with your fingers. Trim off both ends and then cut in half. Cut each half in half once more so you end up with four even pieces. Cut eat piece into thirds so you end up with twelve even pieces. Place the rolls, cut side down, onto the prepared pan (on top of the caramel and walnuts) making sure to place them in there snuggly. Cover lightly with plastic wrap and a damp kitchen towel. Allow to rest in a warm spot for at least 1 hour or until doubled in size.
- Bake for about 30 to 35 minutes or until deep golden brown. Remove from oven and run a knife along the edges of the pan. Allow to cool for about 2 minutes and then carefully invert onto a baking sheet or platter. Allow to cool more and serve warm. Cover with plastic wrap and keep at room temperature for about 3 days or in the fridge for about 5. Enjoy!
Looks fantastic! Pinning it now under “Brunch” – it’s o.k. to have dessert at brunch – right?
Simply AMAZING !!! You blow my mind every single time !!! Brillant !
Umm…YES! Chunky monkey buns?! I am all over these. And I really love your dough recipe too…looks super straight forward!
Thanks Katrina! The dough is beyond easy to make. I made it by hand so totally doable!
These sticky buns are INSANE!! Gah!! I’m dying over these!
I love the twist on the classic cinnamon rolls, and these look absolutely delicious! Would appreciate your help with one question – it’s nearly impossible to find dry milk powder where I live, any ideas for a substitute? Thanks!
Hello Valerie! Thank you so much. I actually included a link on amazon where you can find it online, but if that isn’t an option, then you can actually just leave it out and it’ll be totally fine. It’ll be slightly different in texture but nothing too noticeable! Let me know what you think!
Hi Jonathan, thanks so much for your prompt response! I saw the link earlier, but it’s quite expensive to ship here via Amazon or other services 🙁 Instead of leaving it out, can I substitute all or part of the water with liquid milk? Thanks again for your help – and incredible recipes.
Ahh okay. Definitely makes sense! I’d do half water and half milk! The 1/4 cup to waken up the yeast though, do that with water!
Wow, Jonathan. Do i really need to say? This is out of this world. Love all banana inspired cake!!! By the way, thank for the alcohol tip. I do really love my hair. 🙂
I just made these and they’re great! Soooo tasty and worth the effort.
Thanks Jonathan 😀
Hi Jonathan, I love your recipes. Do you ever use instant yeast? How would I go about changing the recipe to do this? Instant is what I have at home now. Thanks.
Hello Karen! I’ve used it a few times here and there. So, you’ll go about it the same way with the same amount of ingredients and what not BUT you don’t have to do the step of waking up the yeast. So instead, just stir the yeast into the dry ingredients and then add the wet all at once right after. Does that make sense? Also, your rising times will be cut down by half. You’ll notice that the dough will double in size much quicker!