 It’s the first Cheers to the Weekend post of the New Year and it’s really good! Or at least I like to think so because I’m a really big fan of chicken pot pies and Tex-Mex, and so these Tex-Mex Pot Pies are right up my alley. The idea came to me from watching Guy’s Grocery Games. I’m obsessed with this show, I can’t get enough of it. There was one episode where the contestants had to make pot pies and of course they weren’t allowed to make traditional pot pies because to make matters worse, they couldn’t use pie crust or puff pastry and so they had to think outside the box as these shows normally make you do. That’s TV gold right there. One of the contestants decided to make a Mexican pot pie and for her crust she fried up tortillas strips and topped them with that. The judges loved the filling, but weren’t too keen on the “crust” made of tortilla strips. One judge said it would’ve been better if she fried the whole tortillas and topped it like a lid on the pot pies. I can’t remember if she went on to win or not, but her idea along with the judge’s idea gave me the idea to create this masterpiece. Life is crazy. Moral of the story is to watch TV. You’ll get some great ideas. Help me Cheers to the Weekend by making these Tex-Mex pot pies. You won’t regret it.

Let’s first work on the filling. We’ll start by browning the ground chicken with taco seasoning. Break up the chicken with a wooden spoon and cook until crispy and golden brown, about 8 minutes over high heat.
**Note: You can use ground beef or turkey for this instead! Or you can also use boneless skinless chicken breasts, cut into small pieces and browned. If you want a chunkier bite of chicken in the filling.**
 Transfer the chicken to a plate or platter and set aside. Then add some more olive oil and add the chopped up vegetables. Cook until softened and just beginning to brown, about 5 minutes. Season with some more taco seasoning.
**Tip: We’re using taco seasoning throughout this dish in order to add that “Tex-Mex” flavor. You can either make it yourself (and you should because it’s easy) or you can just use a store-bought blend. If you do decide to make your own, check out this taco post from a while back to learn how to make it!** Transfer the veggies to the same platter or place as the chicken and set aside. Return the skillet to the stove and add in the butter. Once melted, whisk in the flour and cook for about 30 seconds. Slowly stream in the chicken stock and whole milk, and cook whisking constantly, until the sauce has thickened, about 5 minutes. Season with more taco seasoning, and a pinch of salt. Add in the shredded Cheddar and Pepper Jack cheese and stir until melted through. Give it a taste and adjust seasonings accordingly, adding more salt or pepper as needed.
 Return the chicken, vegetables and cooked brown rice to the cheese sauce and stir until evenly incorporated.
**Note: You can either use brown or white rice, or even quinoa for the filling. It would be even better to use whatever you have leftover from the night before.** See this filling? It’s a cheesy, delicious, flavor-packed filling that is just as good by itself, like a stew or porridge. But we’re not stopping here. These are pot pies after all, and pot pies aren’t pot pies without a crust of some sort. Some have pie crust or puff pastry, but since these are Tex-Mex pot pies, we’re going to switch things up.
  For the crust, we’re going to use crunchy tortillas! Pour about 2-inches of vegetable or canola oil into a skillet with high sides and set over medium-high heat. Once hot, fry small corn tortillas in batches until golden brown and crispy, about 2 minutes per side. Drain and transfer to a plate lined with paper towels to soak up the excess oil. Continue frying the remaining tortillas. You want 2 per pot pie.
  To take the crust over the edge, we’re going to create “crunchy tortillas stacks.” Spread warmed refried black beans onto a crunchy tortilla. Sprinkle with shredded cheese and then sandwich together with another crunchy tortilla. Continue doing this until you have enough stacks for each pot pie.
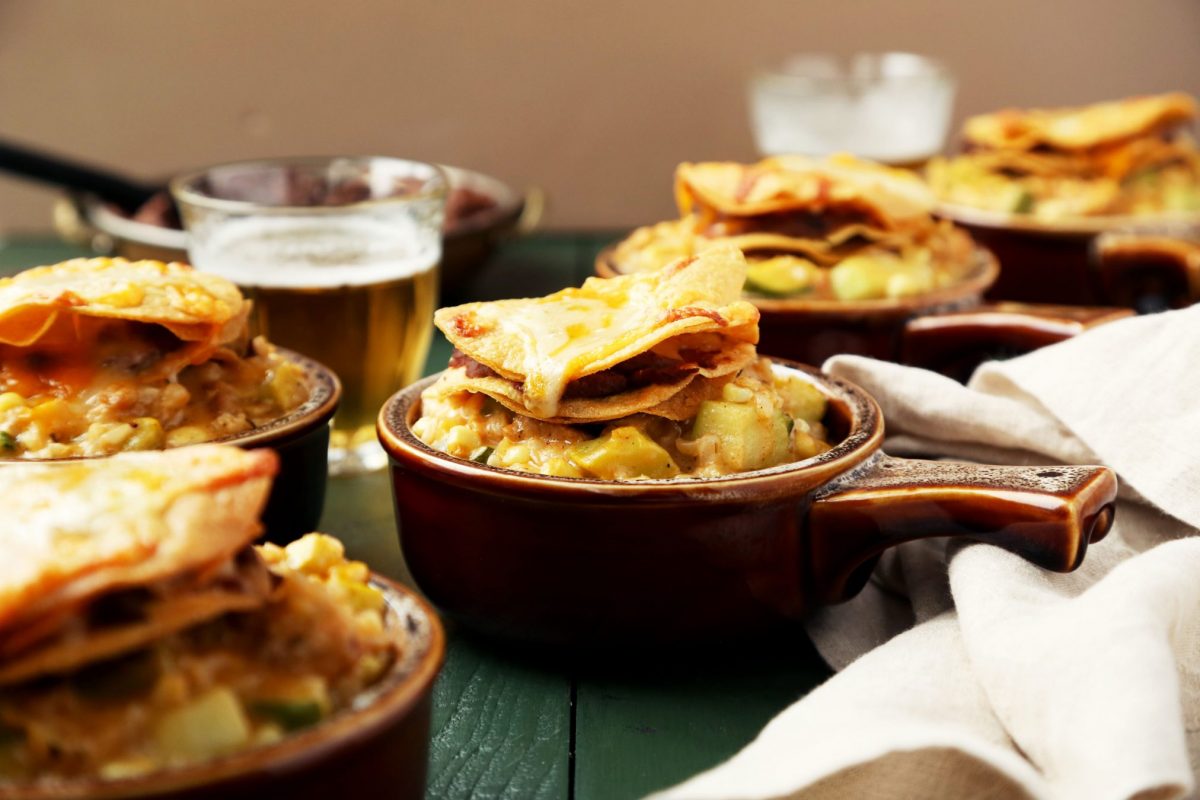
  Divide the filling evenly among individual ramekins. Depending on the size of your ramekins and how much you fill them, you can get about 6 servings.


Place a tortilla stack on top of each pot pie, and then sprinkle with more shredded cheese on top because these pot pies aren’t crazy enough. They just need more cheese.  If you want to make these ahead of time, you can make the filling and pour it into the ramekins and store them in the fridge, covered until you’re ready to cook them. Up to 2 days in advance. Then, when you’re ready to heat and eat, you can make the tortilla toppings and bake until warmed through!
  Bake in a preheated 350 degree F oven until warmed through and the cheese has melted, about 10 to 15 minutes. Everything is cooked through already so we’re just looking to heat things up.
  Remove the pot pies from the oven and let cool slightly before serving. You can serve these pot pies with a simple salad on the side, but they are hearty and filling all on their own because they already have the veggies and rice and beans all in them. It’s really a full and complete meal in one pot pie. Things don’t get any better than this.
  If you’re in need of more pot pie inspiration, then give these Bratwurst, Beer, and Cheddar Pretzel Pot Pies, Steak and Guinness Pot Pies, and Jambalaya Pot Pie. There’s something for everyone!


If you make this recipe, along with any other recipe from the site, be sure to snap a picture and share it on Instagram or Facebook and tag me and hashtag it with #CandidAppetite or #TheCandidAppetite. Once you start making these Cheers to the Weekend recipes, be sure to also tag it with #TCAweekend! I’ll be monitoring it all closely and share my favorites throughout! Happy Cooking!
Tex-Mex Pot Pies
Ingredients
- 2 tablespoons olive oil
- 1 pound lean ground chicken
- 3 teaspoons homemade taco seasoning or store bought
- 1 large yellow onion diced
- 3 garlic cloves minced
- 2 small white or Mexican squash diced
- 1 medium summer squash diced
- 1 medium chayote diced
- 1 small jalapeño seeded and minced
- 2 medium ears of corn kernels cut off the cob
- 2 tablespoons unsalted butter
- 2 tablespoons all-purpose flour
- 1 1/2 cups unsalted chicken stock
- 1 cup whole milk
- 1 1/2 cups shredded Cheddar cheese
- 1 1/2 cups shredded Pepper Jack cheese
- 1 cup cooked brown rice
- 12 small corn tortillas
- vegetable oil for frying
- 1 cup refried black beans warmed
Instructions
- Set a large skillet over high heat with 1 tablespoon oil. Once hot, add the ground chicken and cook, breaking up with a wooden spoon, until crispy and golden brown, about 8 minutes. Season with 1 teaspoon taco seasoning. Transfer the chicken to plate or platter and set aside. Add the remaining tablespoon of oil and stir in the onion, garlic, squash, chayote, jalapeño and corn. Cook until the vegetables have softened and just beginning to brown, about 5 minutes. Season with 1 teaspoon taco seasoning and then transfer to the same plate or platter as the chicken.
- Return the skillet over high heat with the butter. Once melted, whisk in the flour and cook for about 30 seconds. Slowly whisk in the chicken stock and milk. Lower the flame to medium and cook until the sauce has thickened. Stir in 1 cup Cheddar and 1 cup Pepper Jack until melted through. Season with the remaining 1 teaspoon taco seasoning and a pinch more of salt. Fold in the cooked chicken, sautéed vegetables, and brown rice until evenly incorporated. Divide the filling among 6 individual ramekins and place on a baking sheet. Set aside.
- Preheat oven to 350 degrees F.
- To make the crust, pour about 2 inches of vegetable oil in a skillet with high sides over medium-high heat. Once hot, fry the small tortillas, in batches, until golden brown and crunchy about 2 minutes per side. Drain the excess oil and place on a plate lined with paper towels. Continue frying the rest.
- To assemble the crust, spread a bit of the refried beans onto half of the tortillas, sprinkle with the remaining cheese, and then sandwich together with the remaining tortillas. So you'll end up with two tortillas sandwiches together with beans and cheese. Place a stack on top of each pot pie, and sprinkle with more cheese on top.
- Bake until warmed through, and the cheese has melted, about 10 to 15 minutes. Remove from the oven and let cool slightly before serving. Enjoy!
YUM!! I love the combination of flavors and I’m positively envious of your Le Creuset. I notice these things plus your adorable serving bowls! Your recipe sounds and looks delicious. Have a great weekend.
Haha, Marisa! You’re the only person who has noticed that skillet! I’m glad you like it. I think your boys would like this recipe! Have a great weekend, Cheers!
This recipe looks amazing! Very tasty! I need to make me some of these Tex-Mex pies and just love how you used pepper jack cheese! By the way I love your homemade taco seasoning it’s my favorite! Cant stop zooming in it looks that delicious! Happy New Year to You, Julian, and the one and only Napoleon Thecatemperor?
Nelly!!! You would LOVE these! I’m so glad you like the homemade taco seasoning. I always make a big batch and then keep it in the pantry! Happy New Year!!
Brilliant idea Jonathan!!
A nice combination of flavors and everyone gets their own little bowl.
Plus, they look soooo cute…LOL!
This recipe will handle my “mini” crowd of hungry friends for this Sundays get together. 🙂
Thank you so much Dalila! You’ll have to make it and tell me what they think!
I made this but added in some hominy, used premade tostada shells for the “crust,” and some Cotija cheese for a more Mexican flavor. Thanks for the awesome idea!