
I had an undying love for boxed yellow cake mix when I was a kid. I’m sure I wasn’t the only one out there with the same love affair. If I’m being perfectly honest I still have a soft spot for it (shh, don’t tell anyone). I have been known to buy a box, make it and eat it all in one evening. What can I say? Some days are harder than others, and the only medicine is to make cake from a mix. Let’s not talk about it. It has been a while though, so I think that should allow me a bit of forgiveness. When I was younger, I actually made boxed cake all the time and sometimes, more like all the time, I’d act like I had my own cooking show. I’d go through the making of my boxed cake as if I was talking to an audience that wasn’t there, through an invisible camera. “And now we add 1 cup water, 1/3 cup oil and 3 large eggs to our mix and stir it until combined.” It was all pretty legit. Why anyone would want to watch a cooking show where someone was making cake from a box mix, was beyond me. I didn’t even think about that as a kid. I just had the most popular cooking show in my imagination, and everyone wanted to watch it. Humble brag.
Those days are long gone, and although I sometimes crave a boxed cake mix every now and then, I do actually more often than not, just make my own version at home, from scratch without all of the guilt. Although, I still want to eat the entire thing in one sitting so I guess not much as changed in that respect. Who doesn’t like a classic recipe though? That one go-to “fill in the blank” recipe that you can count on to always come out right. I think this post is the epitome of “The Classics” series, and it’s what I had in mind when I first started it a few months ago. It’s my childhood. It has been a while since I created and posted a TCA Classics recipe so I’ll refresh your memory on the concept and the recipes that have gone before.
We kicked things off with The Classics: Buttermilk Fried Chicken, where I introduced to you the idea of simpler posts with less images of recipes we all know and love. Plus, I shared with you our fancy hashtag (#TCAclassics) so that when you give these recipes a try, you can share and tag them so we can all have a look. We’re always searching for that one classic cookie recipe or classic apple pie recipe, so I wanted The Classics to be just that. The recipes you’re looking for. The recipes you love. Things took a savory turn when the second installment brought us, The Classics: Bacon Cheeseburger. Everyone needs a really great All-American burger recipe. Even if you think you don’t, believe me you do. The third round, The Classics: Cinnamon Rolls was where we learned a very important lesson that cinnamon rolls should always be the size of your head. If they’re not, you’re doing it all wrong. The last classics we had was the mother of all American classic recipes, The Classics: Apple Pie. Here I enticed you with large slices of pie topped with ice cream, and I regret nothing. This time around, The Classics: Yellow Cake with Chocolate Buttercream is bringing you a classic birthday or party cake to entice you and your guests. Not having party or your birthday is still a year away, this makes for the best anytime cake. I just cleaned the house, cake! I took out the trash, cake! I didn’t get a parking ticket, cake CAKE! Bottom line is that cake is the answer to everything.


We start like many other cake recipes we know and love, by mixing together the dry ingredients. In a large bowl, sift or whisk together the cake flour, baking powder, and salt.
**Tip: Cake flour makes for the perfect crumb and moisture of a cake, that’s why I love using it in this recipe. I know that it’s hard to find it in some place so you have two options here. One, you can just omit it and use all-purpose flour. It won’t have the same texture but it won’t be the worst thing on the planet. Option two, is you can head on over to Joy’s post for making your own cake flour! Here’s the link!**
Set the dry ingredients off to the side and let’s work on creaming together the butter and sugar.

In a large mixing bowl, cream together the softened unsalted butter and the granulated sugar on high for about 5 minutes, or until fluffy.

Add the eggs one at a time, mixing well after each addition.
**Tip: Make sure the eggs are at room temperature. It’s very important because it makes for a better cake consistency. It also ensure even incorporating into the batter. Trust me on this, you’re baking will change completely if you use room temperature eggs for it. Just set them out when the butter is softening.**

After the eggs have been added, add in the egg yolks and vanilla extract and mix once more until evenly combined. Using a rubber spatula, scrape the sides and bottom of the bowl to get everything mixed well.

Let’s start adding in the dry ingredients along with the buttermilk, alternating between the two. Make sure you begin and end with the dry ingredients. Again, there’s a whole science behind it and I think I’d only confuse us all if I tried to explain it through typing. So let’s just pretend that I did. Flour, milk, flour, milk, flour.

**Note: As you’re stirring the batter, make sure to only mix until just incorporated. You don’t want to over-mix at this point because you’ll end up with a dry and tough cake.**

Grease two 9-inch round (tall) cake pans with cooking spray or softened butter and dust them with flour to ensure they don’t stick to the pans at all. Divide the batter between the two pans, filling up about ¾ of the way up.
**Tip: Give the pans a few taps on the counter to dislodge any air bubbles that are trapped within the cake batter.**

Bake in a preheated 350ºF oven for about 25 to 30 minutes or until golden brown and a toothpick inserted in the middle comes out clean. Rotate the pans halfway through baking to ensure even browning. Remove from the oven and allow to cool on wire rack for about 10 minutes. Run a knife all along the edge of the cake and pan and then invert them to remove the cakes from the pans. Place on wire rack and allow to cool completely COMPLETELY before frosting.
**Note: If your cakes are uneven at the top, cut off with a serrated knife to even out the cake layers.**

Let’s get to working on that chocolate buttercream. It’s just as important as the cake. In a large bowl, sift together the powdered sugar, cocoa powder and salt.
**Note: I know I’m always going on and on about how much I hate sifting, but in this case, I have no choice. It’s important to sift the powdered sugar and cocoa because almost always, they’re always lumpy. You don’t want a lumpy buttercream.**
Cream the butter in a large bowl for a few minutes until fluffy. Then add in the sifted sugar and cocoa and mix, on low so that it doesn’t go flying everywhere, and then raise the speed to high, and continue mixing until combined.

Add in the heavy cream, a little at a time, mixing well after each addition. You want the frosting to be fluffy and spreadable without being too thick or too thin. The amount of cream or milk added at this point might vary so just add a little at a time.

Whip on high until the desired consistency is reached. Fluffy and light is the name of the game.

Once the cake has cooled completely and the frosting is done and ready to go, let’s start building this cake. Place one cake layer, upside down, onto a platter or cake plate or stand. Add a dollop of the chocolate buttercream and spread it out onto an even layer using an offset spatula.

Place the second layer on top, also upside down so you end up with a smooth flat surface on top.

Add another big dollop of buttercream on top and frost the sides and top of the cake as smooth as you possibly can. Again, an offset spatula is the best tool for this if you want a smooth cake. One of those rotating/spinning cake decorating things is also a good tool to have. One of those lazy cake Susan things. If you have one, great. If not, don’t worry about it.

Once the cake is fully frosted and it looks so good you could punch it or yourself because you did such an amazing job (don’t punch the cake or yourself btw) then you can decorate it any which way you’d like!
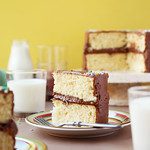
I love sprinkles so of course they made an appearance here.

I’m not one for fancy cakes (all of the time) so this time around, I just wanted to do something simple and clean. I decorated the top edge of the cake with colored sprinkles.

If you’re a master cake decorator, you can get out your piping bag with all of your fancy decorating tips and make cool looking frosting borders on top and the bottom of the cake. You can wow everyone with your mad skills and be the life of the party. Or you can be like me and do the best you can.

For the best of results and taste, you definitely want to assemble and frost the cake on the day you plan on serving and eating it. You don’t want it to dry out.


Don’t get me wrong, you can still make and bake off the cake layers a day or two in advance to get the ball rolling and get ahead of the game. If you do bake them off early, make sure you wrap the cake layers super well with plastic wrap and even place them in one of those big plastic food storage bags. Just to ensure freshness. You can store them in the fridge or freezer until ready to decorate.

As for the chocolate buttercream, that is also best when made on the day you plan on decorating. But don’t be too sad because at least you’ll have your cake layers done and over with already. All that’s left to do is decorate the cake itself, which you can do early in the morning. No fuss no muss.

If you’re really looking to impress your guests, you can cut each of these layers in half to create four thin layers of cake instead of just the two I did. I like thick cake layers, so that’s why I kept them whole and did only two, but four would be just as great if you’d like.


My mom would make my sisters and I this very cake (not from scratch, though, it was from a box) for our birthdays when we were very young. I always looked forward to them every year. Then she stopped doing it and started getting us these delicious strawberry shortcakes from a bakery in Chinatown, when we got older, they were just as delicious. Both of those cakes though, always remind me of my childhood. I’ve recreated that Strawberry Shortcake for the blog before, too!

I don’t think I need to say it, but I’ll say it either way because maybe we’re not on the same page after all. Since this is the perfect birthday cake, no birthday is complete without some ice cream along your cake slice. So if this was my birthday and we were enjoying this awesome cake together, you better believe ice cream would be involved. Make sure you have some on hand when you make this cake for yourself. You’ll be missing out on one of life’s greatest pleasures if you don’t.

Don’t forget to tag your Classic creations from the site on all of your social media using the #TCAclassics hashtag. I love to see your work (especially if you give these classic recipes a try). Also, if you have any suggestions or want to see a specific classic recipe on the site, leave a comment below and let me know what it is! I can always use some inspiration and feedback from you. Now go and make this cake so we can eat it together. Enjoy!

The Classics: Yellow Cake with Chocolate Buttercream
Ingredients
For the yellow cake
- 3¼ cups cake flour
- 2½ teaspoons baking powder
- 1 teaspoon salt
- 1 cup 2 sticks unsalted butter, at room temperature
- 2 cups granulated sugar
- 4 large eggs at room temperature
- 2 large egg yolks at room temperature
- 2 teaspoons vanilla extract
- 1¼ cups buttermilk
For the chocolate buttercream
- 1 cup 2 sticks unsalted butter, at room temperature
- 3½ cups powdered sugar
- ½ cup unsweetened cocoa powder
- pinch of salt
- 2 teaspoons vanilla extract
- 4 to 6 tablespoons heavy cream or whole milk
- sprinkles for decorating
Instructions
- Preheat oven to 350℉. Grease and flour two 9-inch round deep cake pans. Set to the side.
- To make the cake, in a large bowl, combine the flour, baking powder, and salt. Set aside. In a separate large mixing bowl, cream together the butter and sugar on high for about 5 minutes or until light and fluffy. Add the eggs and egg yolks, one at a time, mixing well after each addition. Stir in the vanilla extract and scrape the bottom and sides of the bowl with a rubber spatula to ensure everything gets evenly combined. Add the dry ingredients and the buttermilk to the batter, alternating between the two. Begin and end with the dry ingredients. So add a bit of dry, mix until just combined, buttermilk, mix, dry, mix, milk, mix, and dry, until it's all incorporated. Divide the batter between the prepared cake pans. Give them a few raps on the counter to dislodge any air bubbles.
- Bake for about 25 to 30 minutes or until golden brown and a toothpick inserted in the middle comes out clean. Remove from oven and allow to cool for about 10 minutes. Run a knife along the edge of the cake and then invert to remove the cake from the pan. Allow to cool completely on a wire rack.
- To make the buttercream, in a large bowl, sift together the powdered sugar, cocoa and salt. Set aside. In a separate bowl, cream the butter on high for about 3 minutes until light and fluffy. Slowly add in the dry ingredients, mixing on low until combined. Once all added, raise the speed to high and mix until combined. Add the heavy cream or milk, 1 tablespoon at a time mixing until the frosting it light, fluffy and spreadable. Not too thick, but also not too thin.
- Level off the cooled cakes by trimming the tops to even them out, using a serrated knife. Place one layer on a cake plate or stand and add a dollop of frosting. Smooth it out with an offset spatula into an even layer. Top with the second cake layer, upside down, so that you end up with a flat surface on top. Frost the top and sides of the cake and smooth out as best you can with the offset spatula. Decorate the edges with a piping bag if you wish, or douse the top with sprinkles. Keep at room temperature until ready to cut and serve.
- If you wish to keep it longer than a day before cutting, store in the fridge, covered with plastic wrap. Store any leftovers in the fridge as well, wrapped in plastic. Enjoy!
It is party time! We can always come up with any excuse to have birthday cake. Love your photos. Thanks for sharing the recipe.
I wish you had posted this a week ago when I was searching for a yellow cake with chocolate frosting for a friend’s birthday! 🙂 I ended up using a recipe that called for buttermilk and topped it with a sour cream chocolate frosting – it was a great combo but I’ll definitely try your recipe next birthday!
Looks amazing! Plus, I have the matching apron to those napkins. I almost bought the napkins this week…now I feel like I should go back and get them for when I make this cake!
Looking forward to making this cake! I was wondering if you have advice on keeping it fresh. I’ll be making it on a Saturday afternoon and serving it on a Monday. Should I wait to frost it until Sunday evening?